Level Up Your C++ Game Dev: raylib, the Free CLion, and Conan!


Great news for C++ enthusiasts and aspiring game developers! JetBrains recently announced that CLion, their C++ IDE, is now free for non-commercial use!
This is the perfect opportunity to dive into game development with C++ using Conan and CLion. In this post, we’ll explore raylib, a simple and fun C library for game programming. We’ll show you how to set up a project for a small runner game and manage its dependencies seamlessly using the CMake presets generated by Conan.
About raylib
Created by Ramon Santamaria, raylib is an excellent choice for starting your game development journey. It offers a straightforward, easy-to-use C library ideal for beginners and rapid prototyping. It’s cross-platform (Windows, Linux, macOS, Android, HTML5, etc.) and uses hardware-accelerated OpenGL for rendering. Some of its most relevant features include 2D/3D graphics, audio processing, a powerful math module, input handling, and extensive examples to learn from.
Our Project: A Simple Runner Game with raylib
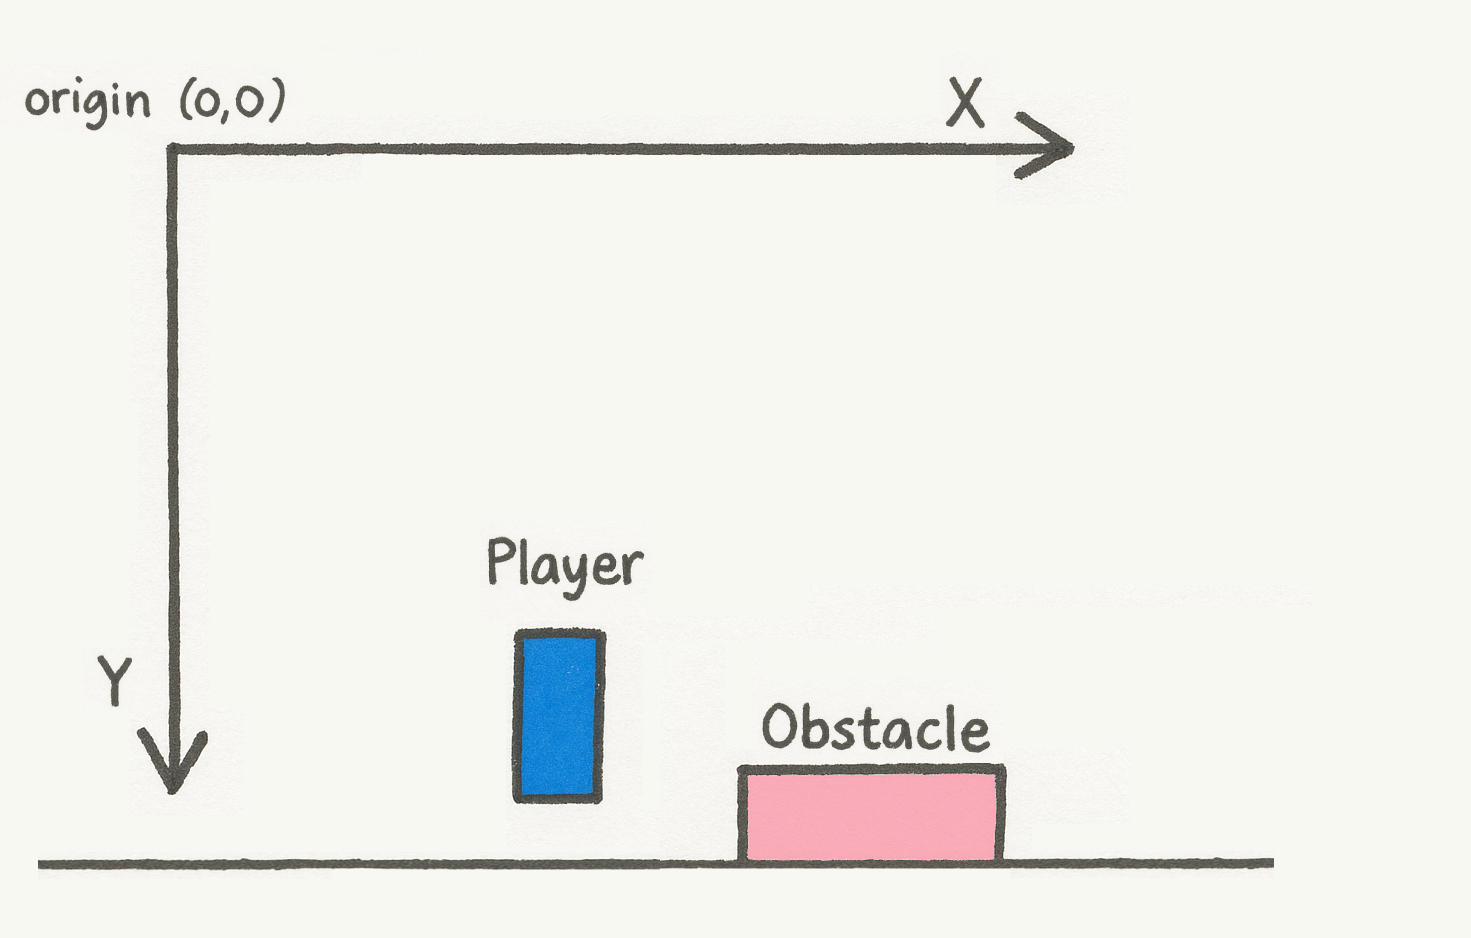
To showcase raylib in action, we’ll build a classic 2D runner game. The player, a blue rectangle, must jump over red rectangular obstacles that approach from the right. The goal is to survive as long as possible, with the score increasing for each successfully avoided obstacle. To make it a bit more challenging, the width of the obstacles and the space between them will be randomized.
You can find all the code for the project in the Conan 2 examples repository. To get the code, clone the repo and navigate to the example’s folder:
$ git clone https://github.com/conan-io/examples2
$ cd examples2/examples/libraries/raylib/introduction
Before diving into the specifics of the code, it’s helpful to understand raylib’s 2D coordinate system. By default, the origin (0,0) is at the top-left corner of the window. The X-axis increases to the right, and the Y-axis increases downwards. This is a common convention in 2D graphics libraries.
Now, let’s dive into the code.
Code Structure and Game Loop Overview
Most games, including ours, follow a fundamental structure:
- Initialization: Set up everything needed before the game starts (window, variables, etc.).
- Game Loop: The core of the game that runs repeatedly. In each iteration (frame), we process user input, update the game world based on that input and internal logic, and then draw the new state of the world.
- Cleanup: Release resources when the game ends.
Here’s a simplified overview of what happens in our main() function:
initialize_everything();      // 1) SETUP – assets, variables, window…
while (game_is_running)       // 2) GAME LOOP – repeats ~60 times per sec
{
    float dt = time_since_last_frame(); // Get time difference for smooth updates

    update_world(dt);         //    a) PROCESS INPUT + APPLY LOGIC + HANDLE PHYSICS
    draw_world();             //    b) RENDER the current state of the game
}
release_resources();          // 3) CLEANUP – free memory, close application
1. Creating the World: Initialization
Every raylib game begins by setting up the main window. The InitWindow()
function defines its dimensions and title. Our player is a simple rectangle, and
we define its initial position (x, y from the top-left) and size, along with
variables for its physics. We also define the ground’s vertical coordinate and
initialize variables for dynamically adding obstacles during the game loop.
Finally, we set a target frame rate using SetTargetFPS() for consistent game
speed.
// --- Initialization ---
const int screenW = 800;
const int screenH = 450;
InitWindow(screenW, screenH, "Jump to Survive!"); // Create window

// --- Player Setup ---
Rectangle player = { 100, screenH - 80, 40, 60 }; // Define player: {x, y, width, height}
float vy = 0; // Player's vertical velocity
const float gravity = 1000.0f; // Downward acceleration
const float jumpImpulse = -450.0f; // Upward force for jump

// --- Ground Definition ---
const int groundY = screenH - 20; // Y-coordinate of the ground

// --- Obstacle Management ---
std::vector<Rectangle> obstacles; // To store active obstacles
float spawnTimer = 0.0f;          // Timer for spawning new obstacles
float spawnInterval = 1.2f;       // Initial interval between spawns
const float obstacleSpeed = 300.0f; // How fast obstacles move

// Parameters for randomizing obstacles
const float minSpawnInterval = 0.8f;
const float maxSpawnInterval = 1.6f;
const int minObsWidth = 40;
const int maxObsWidth = 120;

// --- Game State Variables ---
int score = 0;
bool gameOver = false;

SetTargetFPS(60); // Aim for 60 frames per second
2. The Game Loop — Update First, Then Draw
The game loop is where all the action happens, frame after frame. We first handle updates to the game state (movement, collisions) and then draw everything.
Player Movement and Physics
The player’s movement starts by checking for jump input using IsKeyPressed().
If the spacebar is pressed and the player is on the ground, an upward
jumpImpulse is applied. Gravity is then applied consistently using deltaTime
(obtained from GetFrameTime()), which represents the time elapsed since the
last frame, ensuring physics are independent of frame rate. Finally, we check
for ground collision to prevent the player from falling through the floor.
// Inside the main game loop, if (!gameOver)
if (IsKeyPressed(KEY_SPACE) && player.y + player.height >= groundY) {
    vy = jumpImpulse; // Apply upward force for the jump
}

// Apply gravity
vy += gravity * dt;      // Update vertical velocity
player.y += vy * dt;     // Update player's y-position (positive Y is downwards)

// Ground collision check
if (player.y + player.height > groundY) {
    player.y = groundY - player.height; // Snap player's bottom to ground level
    vy = 0;                             // Reset vertical speed
}
Obstacle Spawning and Management
Obstacles are managed in a std::vector. We use a spawnTimer and
spawnInterval to control their appearance. To add unpredictability, both the
spawnInterval for the next obstacle and the width of the current
obstacle are randomized using GetRandomValue().
// Inside the game loop, if (!gameOver)
spawnTimer += dt; // Increment timer
if (spawnTimer >= spawnInterval) { // Time to spawn a new one?
    spawnTimer = 0.0f; // Reset timer
    // Recalculate the next spawn interval randomly
    spawnInterval = GetRandomValue(int(minSpawnInterval*100), int(maxSpawnInterval*100)) / 100.0f;
    // Determine a random width for the new obstacle
    int w = GetRandomValue(minObsWidth, maxObsWidth);
    // Spawn obstacle at the right edge, resting on the ground, with the random width
    obstacles.push_back({ (float)screenW, (float)(groundY - 40), (float)w, 40.0f });
}
Obstacle Movement and Collision Detection
Each obstacle in the obstacles vector is moved to the left based on
obstacleSpeed and dt. We use CheckCollisionRecs() to detect if the
player’s rectangle collides with any obstacle rectangle. If a collision occurs,
the gameOver flag is set.
// Still inside the game loop, iterating through obstacles
for (int i = 0; i < (int)obstacles.size(); i++) {
    obstacles[i].x -= obstacleSpeed * dt; // Move obstacle left
    if (CheckCollisionRecs(player, obstacles[i])) {
        gameOver = true; // Set game over state upon collision
    }
}
Obstacles that move completely off-screen to the left are removed from the
vector to save resources, and the player’s score is incremented.
// After iterating through obstacles
if (!obstacles.empty() && obstacles.front().x + obstacles.front().width < 0) {
    obstacles.erase(obstacles.begin()); // Remove the first (oldest) obstacle if off-screen
    score++; // Increment score
}
Drawing the Scene
All drawing operations must occur between BeginDrawing() and EndDrawing().
ClearBackground() wipes the previous frame. Then, we use raylib’s Draw...
functions to render the ground, player, obstacles, and text elements like the
score and game over message. TextFormat() is useful for creating strings with
dynamic content. You can find more drawing functions in the raylib
cheatsheet.
// This entire block is inside the main while(!WindowShouldClose()) loop
BeginDrawing(); // Start the drawing phase for the current frame
    ClearBackground(RAYWHITE); // Clear the screen to a background color

    DrawRectangle(0, groundY, screenW, 20, DARKGRAY); // Draw the ground
    DrawRectangleRec(player, BLUE);                    // Draw the player

    // Draw all current obstacles
    for (auto &obs : obstacles) {
        DrawRectangleRec(obs, RED);
    }

    DrawText(TextFormat("Score: %d", score), 10, 10, 20, BLACK); // Display current score

    // If game is over, show the game over message
    if (gameOver) {
        DrawText("GAME OVER! Press R to restart", 200, screenH/2 - 20, 20, MAROON);
    }
EndDrawing(); // End the drawing phase and display the frame
Game Over and Restart Logic
When gameOver is true, the main game update logic is skipped. If the player
presses ‘R’ (IsKeyPressed(KEY_R)), the game state is reset: player position,
velocity, obstacles are cleared, timers and score are reset, and gameOver is
set back to false. Resetting spawnInterval to a default value ensures a fair
restart.
// Inside the game loop, in the 'else' branch of 'if (!gameOver)'
if (IsKeyPressed(KEY_R)) {
    // Reset all necessary game variables to their initial state
    player.y = screenH - 80;      // Reset player's Y position
    vy = 0;                       // Reset vertical velocity
    obstacles.clear();            // Remove all obstacles
    spawnTimer = 0.0f;            // Reset spawn timer
    spawnInterval = 1.2f;         // Reset spawn interval to initial/average
    score = 0;                    // Reset score
    gameOver = false;             // Set game state back to active
}
3. Cleanup
Finally, when the game loop (the while loop) exits, CloseWindow() is called.
This is essential for properly releasing all resources used by raylib, such as
the OpenGL context and any loaded assets.
CloseWindow(); // Unload all loaded data and close the game window
return 0;      // Indicate successful program termination
Building and running our project
We have previously discussed working with Conan in CLion using the Conan CLion
Plugin. This time,
we’ll demonstrate a different approach: manually invoking Conan to generate
CMake presets using the CMakeToolchain generator, and then letting CLion
detect and use these presets for building.
- Open Project: First, start CLion and go to File → Open to open the project folder you cloned from the examples repository.
- Generate Presets: Open a terminal in the project’s root directory (where
the
conanfile.pyis located) and runconan install . --build=missing. This command will install raylib (building it from source if a pre-compiled binary isn’t available for your system in the Conan cache) and generate the necessary CMake preset files (e.g.,CMakeUserPresets.json). - Reload CMake Project in CLion: In CLion, right-click on the
CMakeLists.txtfile in the project view and select “Reload CMake Project”. CLion should detect and load the presets. - Select and Enable Preset: Go to CLion → Settings… → Build, Execution,
Deployment → CMake. In the “CMake Presets” section, you should see the
presets generated by Conan (e.g.,
conan-releaseorconan-debug). Select the desired preset (e.g.,conan-release) to make it active for your build configuration. - Build and Play: Now, click the Build button (hammer icon) in CLion. Once the build is successful, click the Run button (play icon) to start the game!
Next Steps: Your Turn to Create!
Now that you have the basic runner game up and running, the fun really begins! This project serves as a great starting point. Consider these ideas to get you started:
- New Mechanics: Transform the game into a “Flappy Bird” style by changing obstacle spawning to create gaps and modifying player movement for repeated “flaps”.
- Add Depth: Introduce power-ups (like invincibility or higher jumps), diverse obstacle types (circles, polygons, sprites with varied behaviors), or a better scoring system.
- Polish: Enhance the game with improved visuals like textures, scrolling backgrounds, particle effects, and sound effects.
Conclusion
Whether you’re a student taking your first steps into coding, a hobbyist with a cool game idea, or an open-source developer, now is a fantastic time to explore what you can create. So, download CLion, grab raylib using Conan (either via the plugin or CMake presets), and start building your dream game today!
Happy coding!