Taking Your Raylib C/C++ Game to Android with Conan and Android Studio


In our previous post, we built a fun 2D runner game using Raylib and CLion. Now it’s time to take one step ahead and run that game on mobile! In this post, we’ll show you how to build the same “Jump to Survive” game for Android using Android Studio, the Android NDK, and Conan for dependency management.
By the end of this guide, you’ll have your Raylib game running on Android devices with touch controls.
Before we begin, make sure you have Android Studio installed on your machine.
Also, the example code for this post is available on GitHub.
Creating the Android Project
In order to run our Raylib game on Android, we need to create a new Android project with native C++ support.
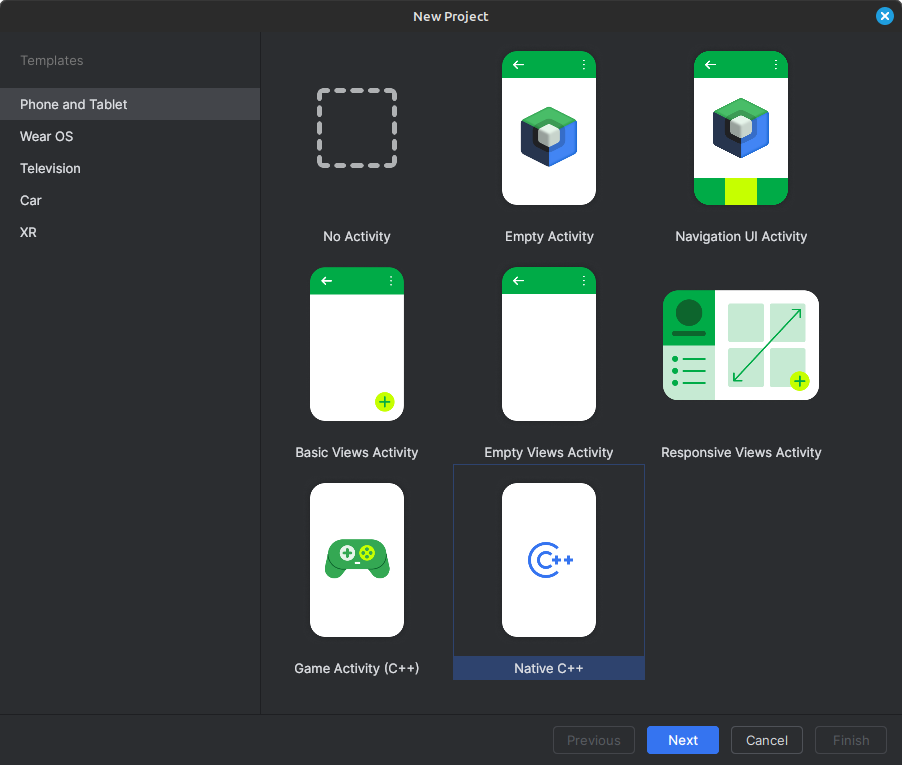
Set Up a New Native C++ Project
-
Open Android Studio and create a New Project
-
Select Native C++ from the templates
-
Name your application (e.g., “RaylibRunner”)
-
Set the Minimum SDK to API level 27 or higher (remember this value for the Conan profile)
-
Choose Groovy DSL for the build configuration language
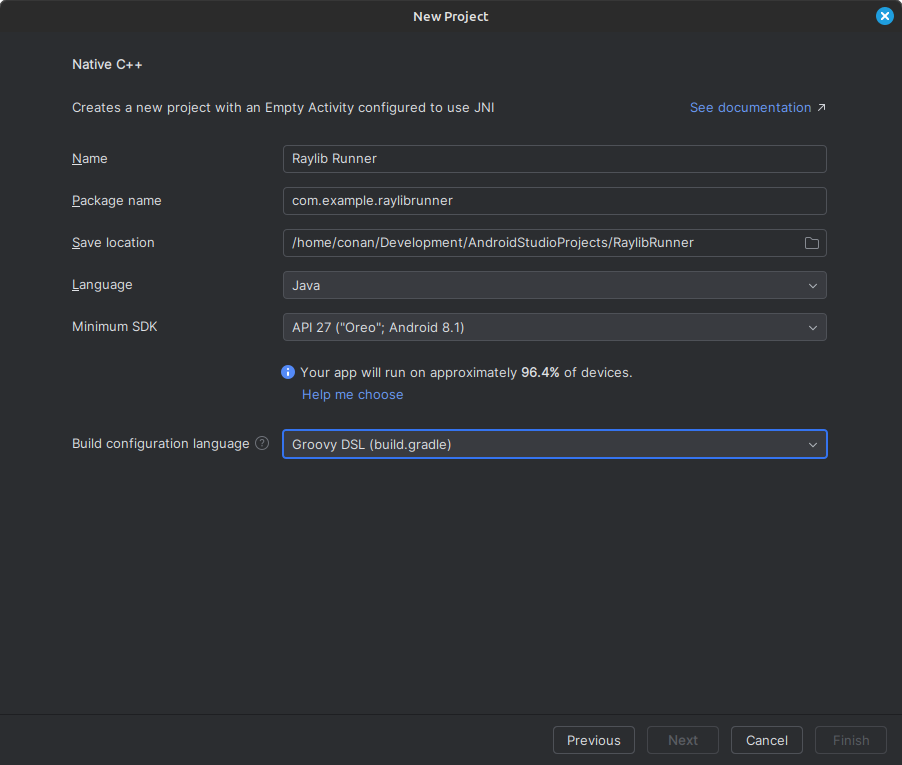
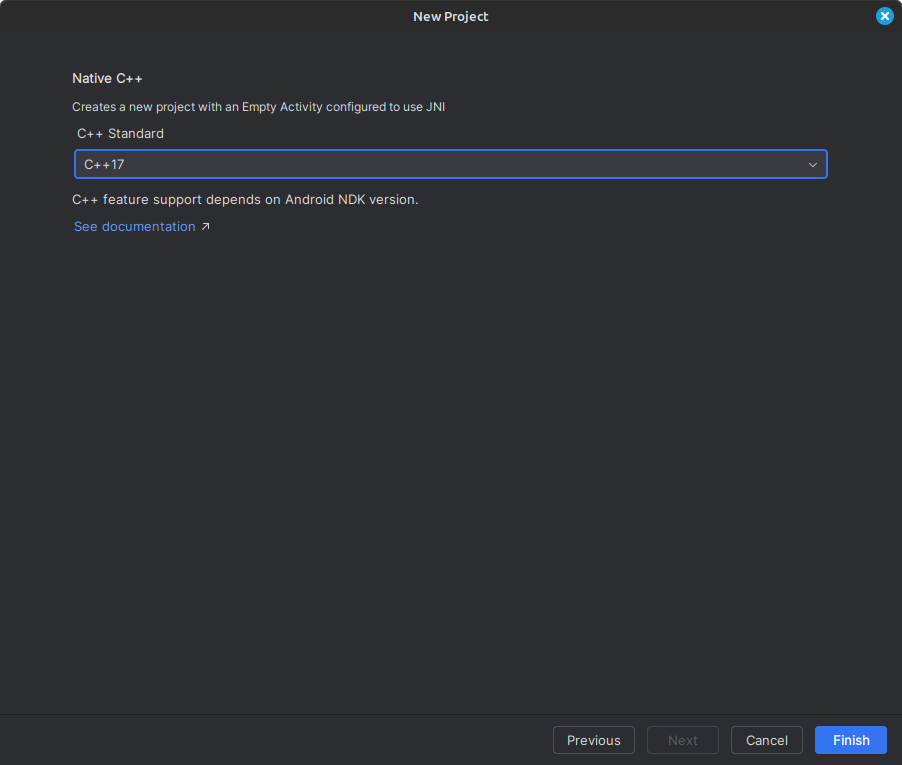
- Next, select C++17 as the C++ Standard (we’ll match this in our Conan profile)
In the end, we will have a basic Android project set up with C++ support. The project structure should look like this:
├── app
│   ├── build.gradle
│   ├── libs
│   └── src
│       ├── main
│       │   ├── AndroidManifest.xml
│       │   ├── cpp
│       │   │   ├── CMakeLists.txt
│       │   │   ├── conanfile.txt
│       │   │   └── native-lib.cpp
│       │   ├── java
│       │   └── res
│       └── test
├── build.gradle
├── gradle.properties
├── local.properties
└── settings.gradle
The cpp folder contains a native-lib.cpp file. This is where our game code will live.
Update the Raylib Example Code
Now that we have the template C++ file, we will re-use the previous example, but adapted for Android. The key differences from the desktop version are:
-
Touch input instead of keyboard (using
GetTouchPointCount()) -
Back button handling with double-press to exit
-
Disabled exit key to prevent accidental app closure
Here’s the complete and updated native-lib.cpp file content (click to show).
#include <jni.h>
#include <android/log.h>
#include <android/native_activity.h>
#include "raylib.h"
#include <vector>

extern "C" {

int main() {
    // --- Initialization ---
    const int screenW = 800;
    const int screenH = 450;
    InitWindow(screenW, screenH, "Jump to Survive!");
    SetExitKey(0); // Disable back button from closing app automatically

    // --- Player Setup ---
    Rectangle player = { 100, screenH - 80, 40, 60 };
    float vy = 0;
    const float gravity = 1000.0f;
    const float jumpImpulse = -450.0f;

    // --- Ground Definition ---
    const int groundY = screenH - 20;

    // --- Obstacle Management ---
    std::vector<Rectangle> obstacles;
    float spawnTimer = 0.0f;
    float spawnInterval = 1.2f;
    const float obstacleSpeed = 300.0f;

    const float minSpawnInterval = 0.8f;
    const float maxSpawnInterval = 1.6f;
    const int minObsWidth = 40;
    const int maxObsWidth = 120;

    // --- Game State Variables ---
    int score = 0;
    bool gameOver = false;

    // --- Back button double press logic ---
    float backPressTime = 0.0f;
    bool backPressedOnce = false;
    const float doublePressInterval = 0.5f; // 0.5 seconds

    SetTargetFPS(60);

    while (!WindowShouldClose()) {
        float dt = GetFrameTime();

        // --- Back button exit logic ---
        if (backPressedOnce) {
            backPressTime += dt;
            if (backPressTime > doublePressInterval) {
                backPressedOnce = false;
            }
        }

        if (IsKeyPressed(KEY_BACK)) {
            if (backPressedOnce) {
                break; // Exit game
            } else {
                backPressedOnce = true;
                backPressTime = 0.0f;
            }
        }

        if (!gameOver) {
            // Jump logic - using touch instead of keyboard
            if (GetTouchPointCount() > 0 && player.y + player.height >= groundY) {
                vy = jumpImpulse;
            }

            // Apply gravity
            vy += gravity * dt;
            player.y += vy * dt;

            // Ground collision
            if (player.y + player.height > groundY) {
                player.y = groundY - player.height;
                vy = 0;
            }

            // Spawn obstacles with random width & interval
            spawnTimer += dt;
            if (spawnTimer >= spawnInterval) {
                spawnTimer = 0.0f;
                spawnInterval = GetRandomValue(int(minSpawnInterval*100),
                                              int(maxSpawnInterval*100)) / 100.0f;
                int w = GetRandomValue(minObsWidth, maxObsWidth);
                obstacles.push_back({ float(screenW), float(groundY - 40),
                                     float(w), 40.0f });
            }

            // Move & collide obstacles
            for (int i = 0; i < (int)obstacles.size(); i++) {
                obstacles[i].x -= obstacleSpeed * dt;
                if (CheckCollisionRecs(player, obstacles[i])) {
                    gameOver = true;
                }
            }

            // Remove off-screen obstacles & increment score
            if (!obstacles.empty() &&
                obstacles.front().x + obstacles.front().width < 0) {
                obstacles.erase(obstacles.begin());
                score++;
            }
        }
        else {
            // Accepting restart
            if (GetTouchPointCount() > 0) {
                // Reset everything
                player.y = screenH - 80;
                vy = 0;
                obstacles.clear();
                spawnTimer = 0.0f;
                spawnInterval = 1.2f;
                score = 0;
                gameOver = false;
            }
        }

        // --- Drawing ---
        BeginDrawing();
        ClearBackground(RAYWHITE);

        DrawRectangle(0, groundY, screenW, 20, DARKGRAY);
        DrawRectangleRec(player, BLUE);
        for (auto &obs : obstacles) DrawRectangleRec(obs, RED);

        DrawText(TextFormat("Score: %d", score), 10, 10, 20, BLACK);

        if (gameOver) {
            DrawText("GAME OVER! Tap to restart", 200, screenH/2 - 20, 20, MAROON);
        }

        if (backPressedOnce) {
            const char *msg = "Press back again to exit";
            int textWidth = MeasureText(msg, 20);
            DrawText(msg, (screenW - textWidth) / 2, screenH - 420, 20, BLACK);
        }

        EndDrawing();
    }

    CloseWindow();
    return 0;
}

} // extern "C"
As you can see, most of the game logic remains unchanged. Let’s highlight the important changes for Android:
Instead of checking for spacebar presses, we use GetTouchPointCount() to detect screen touches:
if (GetTouchPointCount() > 0 && player.y + player.height >= groundY) {
    vy = jumpImpulse;
}
Android users expect the back button to work, but we don’t want accidental exits. We implement a double-press mechanism:
if (IsKeyPressed(KEY_BACK)) {
    if (backPressedOnce) {
        break; // Exit game
    } else {
        backPressedOnce = true;
        backPressTime = 0.0f;
    }
}
Using this code, the game should be fully functional on Android devices. Next, we need to set up Conan to manage our Raylib dependency.
Configuring Conan for Android
As we did in the previous post, we will use Conan to handle the Raylib dependency. However, since we are targeting Android, we will consider this example as a cross-compilation scenario. Now we need to set up a Conan profile for Android and adjust our build process accordingly.
Prepare a Conan File with Raylib as a Dependency
Create a conanfile.txt in the cpp folder with the Raylib dependency. It did not change from the previous example:
[requires]
raylib/5.0

[generators]
CMakeToolchain
CMakeDeps

[layout]
cmake_layout
Set Up the Android Profile
To be able to build for Android, we will be using a Conan profile to define the cross-compilation settings. Create a file called android with the following content:
# <conan_home>/profiles/android
[settings]
arch=armv8
build_type=Release
os=Android
os.api_level=27
compiler=clang
compiler.version=18
compiler.libcxx=c++_static
compiler.cppstd=17

[conf]
tools.android:ndk_path=</path/to/your/system/ndk>
It’s important to match the listed settings with the configuration you selected when creating the Android project:
os.api_level: Match the Minimum SDK you selected in the wizard;compiler.version: Check your Clang version installed in your NDK (usually in<sdk_path>/ndk/<version>/toolchains/llvm/prebuilt/<tripet>/bin/)compiler.cppstd: Match the C++ standard you selected (17 in our case)tools.android:ndk_path: Point to your Android NDK installation (usually in<sdk_path>/ndk/)
Alternatively, you can use the Conan NDK package from Conan Center to manage the NDK installation instead of manually setting the path. In that case, your profile would look like this:
[tool_requires]
*: android-ndk/r27
Automate Conan Installation
Instead of manually running conan install every time we build the project, we can automate this process by adding a custom Gradle task.
As a result, every time we build the project using the IDE, Conan will ensure that the dependencies are installed for all architectures.
Open the build.gradle file in your app module and add the conanInstall task after the plugins block:
plugins {
    ...
}

task conanInstall {
    def conanExecutable = "conan" // define the path to your conan installation
    def buildDir = new File("app/build")
    buildDir.mkdirs()
    ["Debug", "Release"].each { String build_type ->
        ["armv8"].each { String arch ->
            def cmd = conanExecutable + " install " +
                      "../src/main/cpp --profile android -s build_type="+ build_type +" -s arch=" + arch +
                      " --build missing -c tools.cmake.cmake_layout:build_folder_vars=['settings.arch']"
            print(">> ${cmd} \n")

            def sout = new StringBuilder(), serr = new StringBuilder()
            def proc = cmd.execute(null, buildDir)
            proc.consumeProcessOutput(sout, serr)
            proc.waitFor()
            println "$sout $serr"
            if (proc.exitValue() != 0) {
                throw new Exception("out> $sout err> $serr" + "\nCommand: ${cmd}")
            }
        }
    }
}

android {
    // ... rest of your android configuration
}
This task will automatically run conan install for all listed build configurations before building your app.
The current example only includes armv8, but you can add more architectures like armv7, x86, and x86_64 as needed.
In case your Conan client is not in your system PATH, make sure to provide the full path to the conan executable in the conanExecutable variable.
Configuring CMake
Now that Conan is set up to install Raylib for Android, we need to configure CMake to use the Conan generated toolchain and dependency files.
In order to use the correct architecture, we will create a small CMake wrapper that selects the appropriate one based on the Android ABI being built.
Create a file called conan_android_toolchain.cmake in the cpp folder:
if ( NOT ANDROID_ABI OR NOT CMAKE_BUILD_TYPE )
    return()
endif()

if(${ANDROID_ABI} STREQUAL "x86_64")
    include("${CMAKE_CURRENT_LIST_DIR}/build/x86_64/${CMAKE_BUILD_TYPE}/generators/conan_toolchain.cmake")
elseif(${ANDROID_ABI} STREQUAL "x86")
    include("${CMAKE_CURRENT_LIST_DIR}/build/x86/${CMAKE_BUILD_TYPE}/generators/conan_toolchain.cmake")
elseif(${ANDROID_ABI} STREQUAL "arm64-v8a")
    include("${CMAKE_CURRENT_LIST_DIR}/build/armv8/${CMAKE_BUILD_TYPE}/generators/conan_toolchain.cmake")
elseif(${ANDROID_ABI} STREQUAL "armeabi-v7a")
    include("${CMAKE_CURRENT_LIST_DIR}/build/armv7/${CMAKE_BUILD_TYPE}/generators/conan_toolchain.cmake")
else()
    message(FATAL_ERROR "Not supported configuration: ${ANDROID_ABI}")
endif()
The expected file path structure is based on the Conan CMake layout. This wrapper will be later referenced in our Gradle configuration to ensure the correct toolchain is used during the build.
Update CMakeLists.txt
The folder cpp contains a default CMakeLists.txt file generated by Android Studio.
We need to modify it to link against Raylib and use the Conan toolchain.
To do this, replace the contents of CMakeLists.txt in the cpp folder:
cmake_minimum_required(VERSION 3.22.1)
project("raylibexample" LANGUAGES C CXX)

set(NATIVE_APP_GLUE_DIR ${ANDROID_NDK}/sources/android/native_app_glue)

find_package(raylib CONFIG REQUIRED)

add_library(${CMAKE_PROJECT_NAME} SHARED)

target_sources(${CMAKE_PROJECT_NAME} PRIVATE
    ${NATIVE_APP_GLUE_DIR}/android_native_app_glue.c
    native-lib.cpp)

target_include_directories(${CMAKE_PROJECT_NAME} PRIVATE
    ${NATIVE_APP_GLUE_DIR})

target_link_libraries(${CMAKE_PROJECT_NAME} PRIVATE
    android
    log
    EGL
    GLESv2
    OpenSLES
    m
    raylib)
This CMake file has been updated in order to work for our scenario, and may have some differences compared to a regular desktop CMakeLists.txt:
-
We include native_app_glue from the NDK to handle Android app lifecycle events. Without this, our app would not respond correctly to system events.
-
We link against Android specific libraries like
android,log,EGL,GLESv2, andOpenSLESwhich are required for graphics and audio on Android. These libraries are provided by the NDK itself. -
The Raylib Conan package is found using
find_package(raylib CONFIG REQUIRED), which relies on the Conan CMakeDeps generator to provide the necessary configuration files. The Raylib project project the CMake targetraylibthat we link against.
Configure the Toolchain in Gradle
Now it’s time to tell Gradle to use our conan_android_toolchain.cmake file during the CMake build process.
In your build.gradle, add the CMake toolchain file path in the android.defaultConfig.externalNativeBuild.cmake:arguments section:
android {
    ...

    externalNativeBuild {
        cmake {
            arguments("-DCMAKE_TOOLCHAIN_FILE=conan_android_toolchain.cmake")
        }
    }

    ...
}
Building and Running
Now that everything is set up, it’s time to build and run our Raylib game on Android!
-
Click Build -> Assemble ‘app’ Run Configuration in Android Studio
-
You’ll see Conan installing Raylib for all listed architectures. This may take a few minutes the first time.
-
Once complete, CMake will build your native shared library
Now, you can run the app on an Android device or emulator:
-
Connect an Android device or start an emulator
-
Click the Run -> Run ‘app’ button on Android Studio.
-
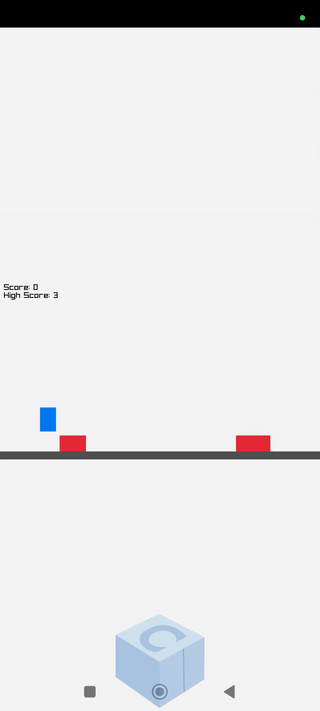
Your game should launch on the device! Use touch to make the rectangle jump over obstacles.
Troubleshooting
Besides the usual Android development issues, here are some common pitfalls specific to this setup:
Can Not Install The Example App: Make sure you have enabled Developer Options and USB Debugging on your Android device. Those settings are required to install and run apps from Android Studio.
NDK Not Found: Make sure the tools.android:ndk_path in your profile points to the correct NDK installation. You can find SDK at Android Studio under Tools -> SDK Manager -> Android SDK Location, that path usually contains the ndk folder.
Conan Install Fails: Verify your profile settings match your project configuration (API level, C++ standard, compiler version).
Build Errors: Check that the conan_android_toolchain.cmake file is in the cpp folder and that the path in build.gradle is correct.
Touch Not Working: Make sure you’re testing on a device or emulator with touch support. The emulator’s mouse clicks should register as touches.
Conclusion
Congratulations! You’ve successfully ported a Raylib game to Android using Android Studio and Conan. This workflow makes it easy to manage C++ dependencies and build cross-platform games. The combination of Raylib, Conan, and Android Studio gives you everything you need to create mobile games.
Happy mobile game development! 🎮📱