Getting started with the SDL2 library for Game Development


The best part of programming is creating something that others can enjoy. Which is probably why we all want to at least try and make a game, but learning a full-blown engine can be pretty daunting.
There are a choices that can make developing a graphical application more approachable, especially for C and C++ specifically. There’s OpenGL and SDL, these will abstract the hardware but give us more freedom to write application code. These are staples for “Introduction to Game Dev Course”. However, this can quickly become overwhelming as building these libraries from scratch can be a challenge in and of itself.
SDL2, or Simple DirectMedia Layer 2.0, is a library designed to provide low-level access to audio, keyboard, mouse, joystick, and graphics hardware. It’s cross-platform and mobile-friendly, so there are a lot of options and opportunities to dive deeper into different aspects of developing a game in C++.
This how-to will walk you through setting up a basic app with keyboard controls, images, and text. That’s a solid starting point to making a Snake or Pac-Man style game. For more advanced games, I’ll leave some excellent references for you to continue with once you’re set up!
Making our first game
SDL2 is very approachable. The basics are initializing, creating a render loop, and cleaning up. The example we are going to build in this blog can be found on GitHub conan-examples2 repository.
You can follow this section by cloning the examples and running the install command yourself!
git clone https://github.com/conan-io/examples2.git
cd examples2/examples/libraries/sdl2/introduction
1: Creating a window and Render
#include <stdio.h>
#include <SDL2/SDL.h>
#include <SDL2/SDL_timer.h>

int main(int argc, char *argv[])
{
    // returns zero on success else non-zero
    if (SDL_Init(SDL_INIT_EVERYTHING) != 0) {
        printf("error initializing SDL: %s\n", SDL_GetError());
        return 1;
    }
    SDL_Window* win = SDL_CreateWindow("GAME", // creates a window
                                    SDL_WINDOWPOS_CENTERED,
                                    SDL_WINDOWPOS_CENTERED,
                                    1000, 1000, 0);

    // triggers the program that controls
    // your graphics hardware and sets flags
    Uint32 render_flags = SDL_RENDERER_ACCELERATED;

    // creates a renderer to render our images
    SDL_Renderer* rend = SDL_CreateRenderer(win, -1, render_flags);

    ///
    /// Section 2: SDL image loader
    ///

    ///
    /// Section 4: SDL ttf and rendering text
    ///

    ///
    /// Section 3: Game Loop and Basic Controls
    ///

    // We add a delay in order to see that our window
    // has successfully popped up.
    SDL_Delay(3000);

    ///
    /// Section 5: Freeing resources
    ///

    // We destroy our window. We are passing in the pointer
    // that points to the memory allocated by the
    // 'SDL_CreateWindow' function. Remember, this is
    // a 'C-style' API, we don't have destructors.
    SDL_DestroyWindow(win);

    // We safely uninitialize SDL2, that is, we are
    // taking down the subsystems here before we exit
    // our program.
    SDL_Quit();
}
This is the minimum you need to just open a window.
Note: On mac, applications and windows exist differently so you will notice it on your dock but most likely not pop-up.
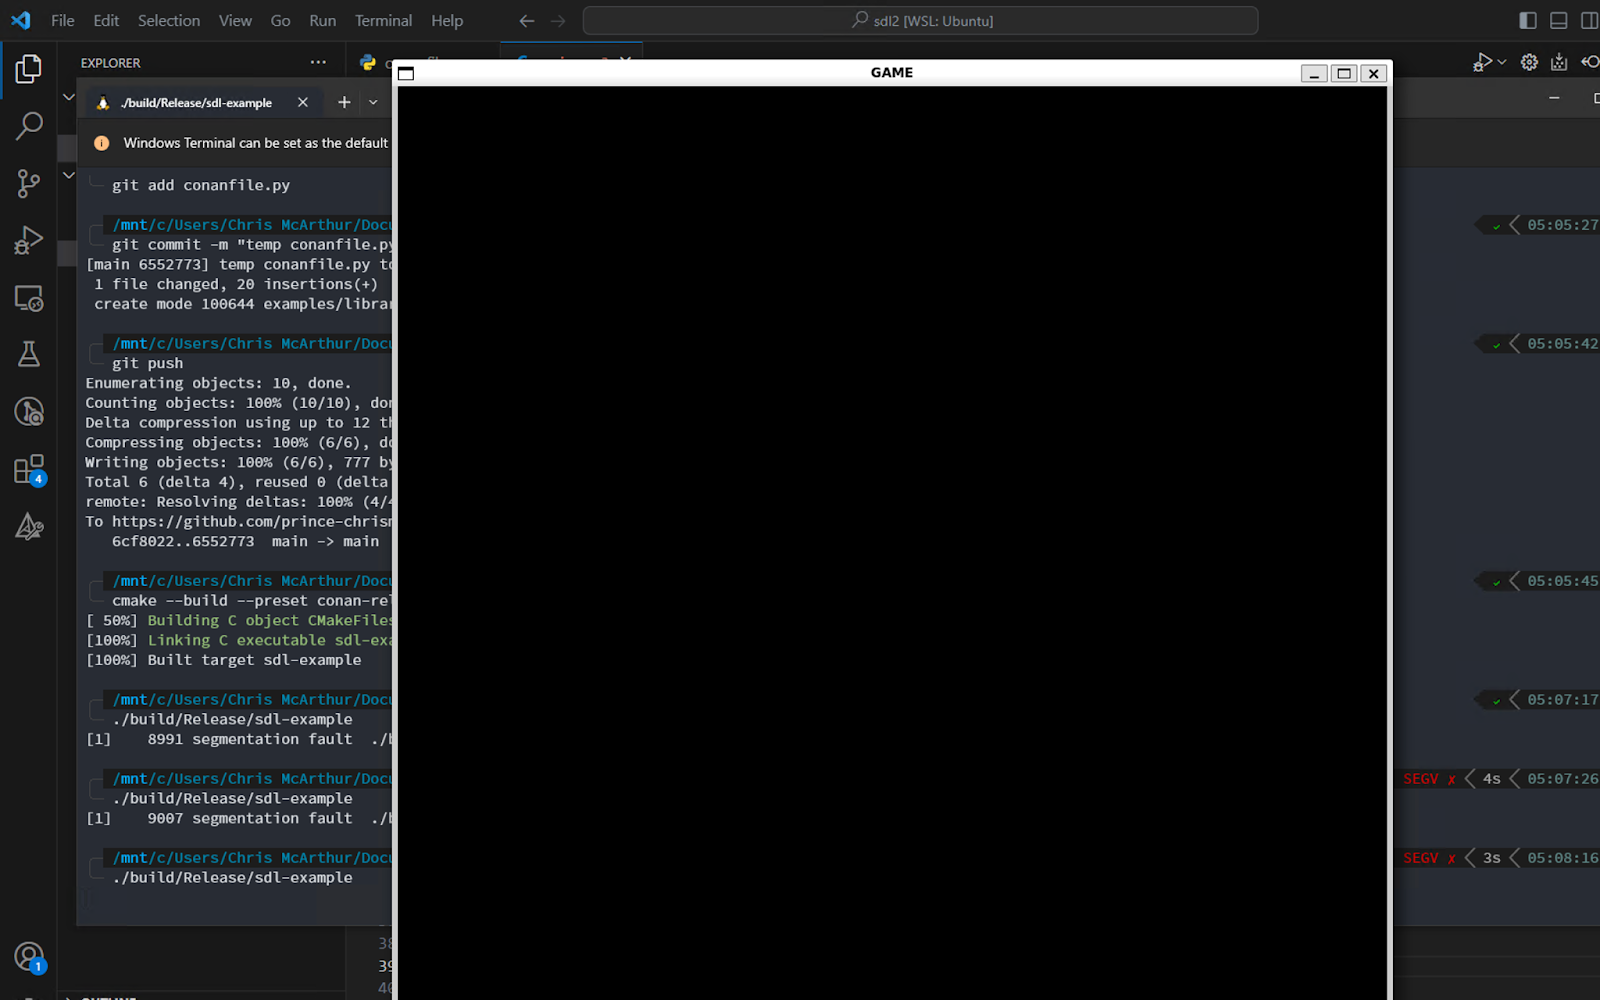
Let’s not mention the segmentation fault when the window closes. We’ll solve that later when we make sure to clean up!
2: Using SDL_Image for Loading an Image
Make sure to add the header include for this library #include SDL2/SDL_image.h>
    ///
    /// Section 2: SDL image loader
    ///

    // creates a surface to load an image into the main memory
    SDL_Surface* surface;

    // please provide a path for your image
    surface = IMG_Load("conan-logo.png");

    // loads image to our graphics hardware memory.
    SDL_Texture* tex = SDL_CreateTextureFromSurface(rend, surface);

    // clears main-memory
    SDL_FreeSurface(surface);

    // let us control our image position
    // so that we can move it with our keyboard.
    SDL_Rect dest;

    // connects our texture with dest to control position
    SDL_QueryTexture(tex, NULL, NULL, &dest.w, &dest.h);

    // adjust height and width of our image box.
    dest.w /= 6;
    dest.h /= 6;

    // sets initial x-position of object
    dest.x = (1000 - dest.w) / 2;

    // sets initial y-position of object
    dest.y = (1000 - dest.h) / 2;

    ///
    /// Section 4: SDL ttf and rendering text
    ///

    ///
    /// Section 3: Game Loop and Basic Controls
    ///     Note: The rest of this snippet will be removed

    while (1)
    {
        // clears the screen
        SDL_RenderClear(rend);
        SDL_RenderCopy(rend, tex, NULL, &dest);

        // triggers the double buffers
        // for multiple rendering
        SDL_RenderPresent(rend);
    }

    ///
    /// Section 3: Game Loop and Basic Controls
    ///     Note: The code above will be removed

    ///
    /// Section 5: Freeing resources
    ///
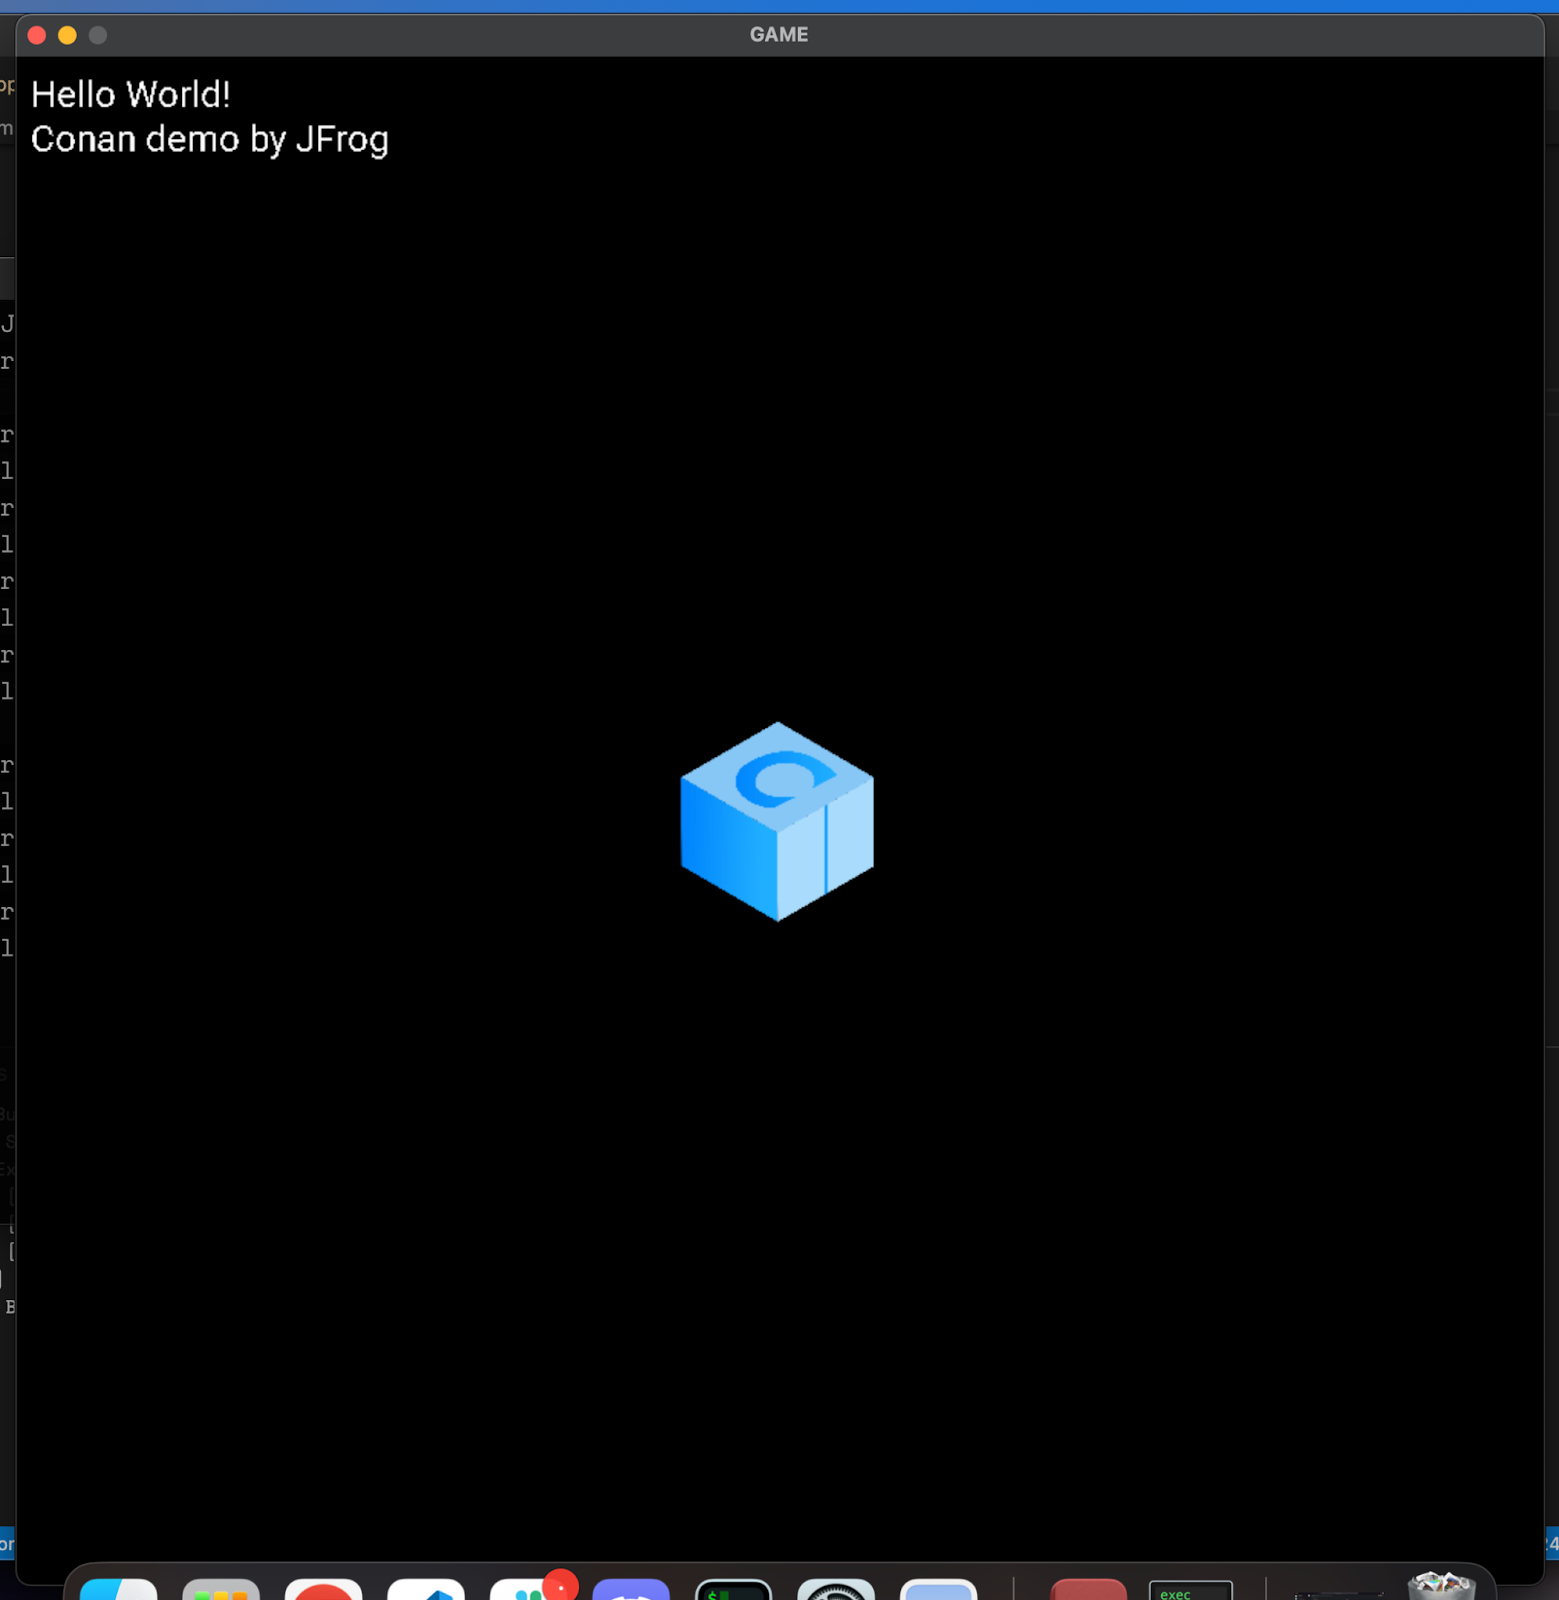
Looking into the code, there are a few things to remark. Images are loaded from disk and then converted into a texture. Everything we will display needs to be a texture. With the texture, we can query what has been filled and work backwards to center the image on the window.
![]()
Success! We have our Conan 2.0 logo rendered in our window.
Now, try to close the window. Oh, it does not?! That’s because we wrote an infinite loop while(1), which will run forever . You’ll need to open the task manager and kill the app. Any game needs to have a control loop that starts every frame, waits for user input, shows the graphs, and lets you close gracefully.
3: Game loops and basic controls
Now, we will need to replace some of the temporary code that pops the windows and displays the image. That code was limited to only rendering once, but now we want to be able to update and re-render the image with each user input.
    ///
    /// Section 4: SDL ttf and rendering text
    ///

    ///
    /// Section 3: Game Loop and Basic Controls
    ///

    // controls animation loop
    int close = 0;

    // speed of box
    int speed = 300;

    // animation loop
    while (!close) {
        SDL_Event event;

        // Events management
        while (SDL_PollEvent(&event)) {
            switch (event.type) {

            case SDL_QUIT:
                // handling of close button
                close = 1;
                break;

            case SDL_KEYDOWN:
                // keyboard API for key pressed
                switch (event.key.keysym.scancode) {
                case SDL_SCANCODE_ESCAPE:
                    close = 1;
                    break;
                case SDL_SCANCODE_W:
                case SDL_SCANCODE_UP:
                    dest.y -= speed / 30;
                    break;
                case SDL_SCANCODE_A:
                case SDL_SCANCODE_LEFT:
                    dest.x -= speed / 30;
                    break;
                case SDL_SCANCODE_S:
                case SDL_SCANCODE_DOWN:
                    dest.y += speed / 30;
                    break;
                case SDL_SCANCODE_D:
                case SDL_SCANCODE_RIGHT:
                    dest.x += speed / 30;
                    break;
                default:
                    break;
                }
            }
        }

        // right boundary
        if (dest.x + dest.w > 1000)
            dest.x = 1000 - dest.w;

        // left boundary
        if (dest.x < 0)
            dest.x = 0;

        // bottom boundary
        if (dest.y + dest.h > 1000)
            dest.y = 1000 - dest.h;

        // upper boundary
        if (dest.y < 0)
            dest.y = 0;

        // clears the screen
        SDL_RenderClear(rend);
        SDL_RenderCopy(rend, tex, NULL, &dest);

       ///
       /// Section 4: SDL ttf and rendering text
       ///

        // triggers the double buffers
        // for multiple rendering
        SDL_RenderPresent(rend);

        // calculates to 60 fps
        SDL_Delay(1000 / 60);
    }

    ///
    /// Section 3: Game Loop and Basic Controls
    ///

    ///
    /// Section 5: Freeing resources
    ///
We should have the basis for our game!
Try moving the cube around and watch it step around!
4: Adding SDL_ttf and a font to display text in out game
Let’s add the header #include <SDL2/SDL_ttf.h> to the top of our main code file.
Text is actually complicated! Each letter is a glyph, and each one needs to be rasterized into a texture so that we can add it to our render loop. We are going to make a helper function for this.
SDL_ttf does a lot of this and gives us both RenderText and CreateTexture, which, if you recall, is what we ultimately displayed with our cube.
You can add the following helper above the main function:
void render_text(
    SDL_Renderer *renderer,
    int x,
    int y,
    const char *text,
    TTF_Font *font,
    SDL_Rect *rect,
    SDL_Color *color
) {
    SDL_Surface *surface;
    SDL_Texture *texture;

    surface = TTF_RenderText_Solid(font, text, *color);
    texture = SDL_CreateTextureFromSurface(renderer, surface);
    rect->x = x;
    rect->y = y;
    rect->w = surface->w;
    rect->h = surface->h;
    SDL_FreeSurface(surface);
    SDL_RenderCopy(renderer, texture, NULL, rect);
    SDL_DestroyTexture(texture);
}
Next up we need to load the font we want to use, for this demo I picked Roboto, this will go outside of our game loop and this only needs to be called once.
    ///
    /// Section 4: SDL ttf and rendering text
    ///

    // Init TTF
    TTF_Init();
    TTF_Font *font = TTF_OpenFont("Roboto-Regular.ttf", 24);
    if (font == NULL) {
        printf("error initializing TTF: %s\n", TTF_GetError());
        return 1;
    }

    ///
    /// Section 3: Game Loop and Basic Controls
    ///
Now to call it during our game loop
        ///
        /// Section 4: SDL ttf and rendering text
        ///

        // create a rectangle to update with the size of the rendered text
        SDL_Rect text_rect;

        // The color for the text we will be displaying
        SDL_Color white = {255, 255, 255, 0};

        // so we can have nice text, two lines one above the next
        render_text(rend, 10, 10, "Hello World!", font, &text_rect, &white);
        render_text(rend, 10, text_rect.y + text_rect.h, "Conan demo by JFrog", font, &text_rect, &white);

        // triggers the double buffers
        // for multiple rendering
Just a note here, the helper function we wrote recreates the same texture on each iteration of the loop. This won’t affect our example but if your game got complicated this could be quite inefficient.
5: Cleaning up and freeing resources
One of the most important steps when working with C-style APIs like SDL’s is memory management, a lot of these structures are allocated on the stack and we need to free them.
    ///
    /// Section 5: Freeing resources
    ///

    // close font handle
    TTF_CloseFont(font);

    // close TTF
    TTF_Quit();

    // destroy texture
    SDL_DestroyTexture(tex);

    // destroy renderer
    SDL_DestroyRenderer(rend);
Installing SDL2 and setting up your project
The first step is to set up CMake to build our project. Following the SDL CMake instructions, we will note that there are several CMake targets depending on whether we are using the static or shared options of the library.
    cmake_minimum_required(VERSION 3.15)
    project(sdl-example CXX)

    find_package(SDL2 REQUIRED CONFIG)
    find_package(SDL2_image REQUIRED CONFIG)
    find_package(SDL2_ttf REQUIRED CONFIG)

    add_executable(sdl-example src/main.c)


    # Main SDL library for init
    target_link_libraries(${PROJECT_NAME} PRIVATE SDL2::SDL2main SDL2::SDL2-static)


    # SDL image to make a surface (aka what we'll render)
    target_link_libraries(${PROJECT_NAME} PRIVATE SDL2_image::SDL2_image-static)


    # SDL ttf so we can display hello world!
    target_link_libraries(${PROJECT_NAME} PRIVATE SDL2_ttf::SDL2_ttf)
Now, we can use Conan, a C and C++ package manager, to install the libraries. It will not only install SDL2, but also all the necessary transitive dependencies. Conan fetches these packages from the default ConanCenter remote, which is the official repository for open-source Conan packages.
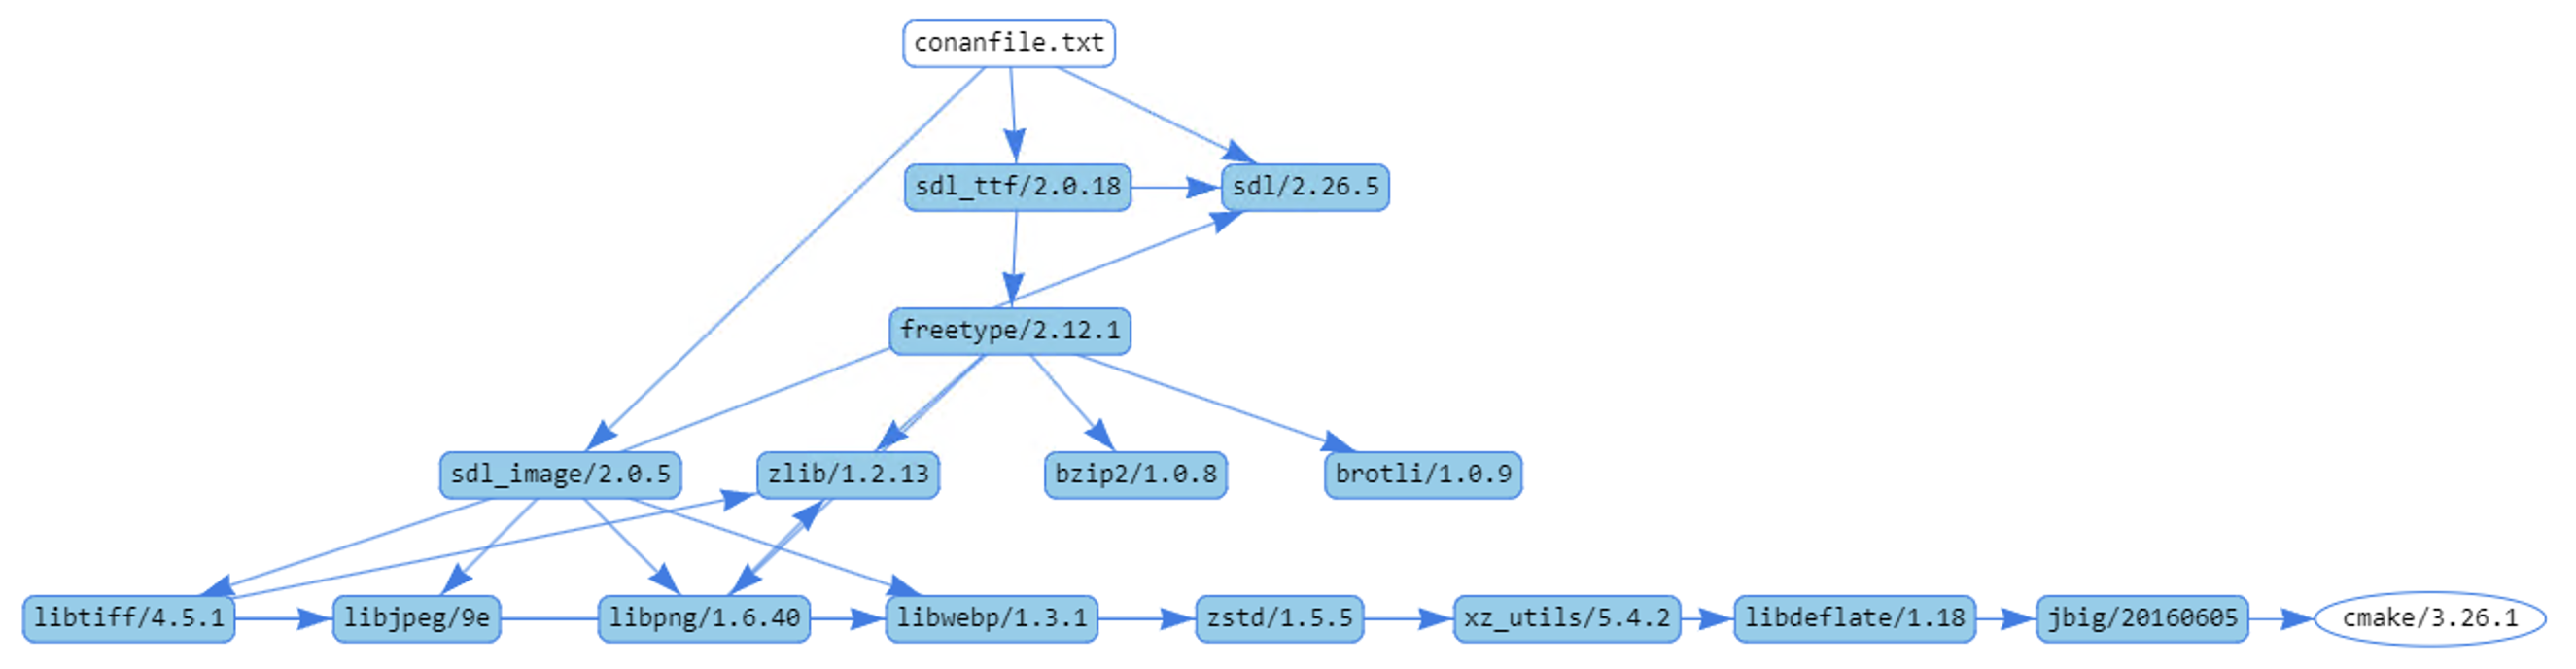
The reason to reach for Conan is because while it’s possible to build SDL locally, there’re a LOT of dependencies. Freetype, libjpeg, libwebp and libdeflate just to name a few. Different platforms and different options also need different dependencies, this is the HTML graph view for Windows MSVC 19.3, which using the conanfile.txt below, you can make with conan graph info . --format=html > graph.html to see what it looks like for any project!
To install the SDL libraries needed we can create a conanfile.txt that declares the dependencies for the project.
[requires]
sdl_image/[~2.6]
sdl_ttf/[~2.0]
sdl/[~2.28]

[generators]
CMakeToolchain
CMakeDeps

[layout]
cmake_layout
The first section [requires] list the 3 SDL libraries we are using sdl, image, and ttf. For these we are using version ranges to let Conan pick the best patch version that is available (that’s what the ~ denotes). This is an effective way to handle dependencies diamond problem which does exist in the graph when using SDL. As an example sdl/[~2.0] means that any version of SDL bettween 2.0.0 and 2.0.x but not 2.1.0 would be acceptable.
We will use CMakeDeps to generate the configuration files for CMake’s find_package used in the CMakeLists.txt. In addition, there’s CMakeToolchain to generate all the information that the build-system needs. Also, note that we declared a [layout] for the project as cmake_layout, which will help keep our project folder organized as we build. You can check the consuming packages tutorial section of the Conan documentation for more information.
conan install . --build=missing
With the conan install command we install all the necessary packages locally and also generate the necessary files to build our application. Please note that we used the --build=missing argument in case some binaries are not available from the remote. Also, if you are running Linux and some necessary missing system libraries are missing on your system, you may have to add the -c tools.system.package_manager:mode=install or -c tools.system.package_manager:sudo=True arguments to the command line (docs reference).
Build and Run our Game
Now let’s build the project and run the application. If you have CMake>=3.23 installed, you can use CMake presets:
# Linux, macOS
cmake --preset conan-release
cmake --build --preset conan-release
cd build/Release
./sdl-example
# Windows
cmake --preset conan-default
cmake --build --preset conan-release
cd build\Release
sdl-example.exe
Otherwise, you can add the necessary arguments for CMake:
# Linux, macOS
cmake . -G "Unix Makefiles" -DCMAKE_TOOLCHAIN_FILE=build/Release/generators/conan_toolchain.cmake -DCMAKE_BUILD_TYPE=Release
cmake --build .
./sdl-example

# Windows. Assuming Visual Studio 17 2022
# is your VS version and that it matches
# your default profile
cmake . -G "Visual Studio 17 2022"
-DCMAKE_TOOLCHAIN_FILE=./build/generators/conan_toolchain.cmake
cmake --build . --config Release
sdl-example.exe
Conclusions
SDL2 is a powerful library with an easy to use API which allows C and C++ developers of all skill levels access to quickly making graphical interfaces.
With this we covered, install SDL, setting up our project, and running our very first game! That game is a great starting point with a basic window, image, game controls and render loop, and event text. This gave us a simple “game” where we can move our Conan 2.0 cube around the window.
If you want to continue, adding more object and detecting the intersection would be a great addition.
So, what are you waiting for? Dive in, play around with SDL2, and see how it jives with your own project!
Bonus Material
- https://github.com/MikeShah/SDL2_Tutorials/tree/main
- https://www.geeksforgeeks.org/sdl-library-in-c-c-with-examples/
- https://thenumb.at/cpp-course/index.html https://thenumb.at/cpp-course/sdl2/01/01.html
- https://codereview.stackexchange.com/questions/212296/snake-game-in-c-with-sdl
- https://stackoverflow.com/questions/29064904/how-to-render-fonts-and-text-with-sdl2-efficiently