Real-Time Pose Detection in C++ using Machine Learning with TensorFlow Lite


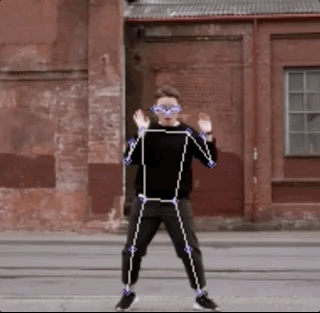
In this post, we’re going to dive into using TensorFlow Lite in C++ for real-time human pose estimation with the help of a model downloaded from TensorFlow Hub, specifically trained for this purpose. We’ll put together an example that uses OpenCV to load a video and then processes it frame by frame to figure out the joint locations of a human body in each image. When we’re done, our application should look something like this1:
A short introduction
TensorFlow Lite is a library specially designed for deploying deep learning models on mobile, microcontrollers, and other edge devices. The main difference between TensorFlow and TensorFlow Lite is that TensorFlow is used for creating and training machine learning models, while TensorFlow Lite is a simpler version designed for running those models on devices like mobile phones.
TensorFlow Hub is a repository where we can find lots of trained machine learning models, ready to be used in our applications. For the case of our example, we will use the MoveNet.SinglePose.Lightning model, but there are many other models compatible with TensorFlow Lite in the TensorFlow Hub. Some examples include:
- Image style transfer
- Image depth estimation from monocular images
- Different types of applications of image classification like for crop-dissease, insect identification, or food classification.
- Image superresolution
Some essential concepts
Before diving into the example, let’s briefly explain some essential concepts:
- Model: A machine learning model is a mathematical representation of a real-world process, learned from data. It is used to make predictions or decisions without being explicitly programmed to perform the task.
- Inference: Inference is the process of using a trained machine learning model to make predictions or decisions based on new input data. It allows the model to apply its learned knowledge to new, unseen data.
- Tensor: A multi-dimensional array used to represent data in deep learning models. Tensors are the primary data structure used in TensorFlow to represent and manipulate data.
- Shape: The dimensions of a tensor, describing the number of elements in each dimension. For example, a matrix with 3 rows and 4 columns has a shape of (3, 4).
- Channel: In the context of image processing, channels refer to the separate color components of an image. For example, a typical color image has three channels: red, green, and blue (RGB).
Using TensorFlow Lite in your application
All the source code for this example is available in the Conan 2.0 examples repo:
git clone https://github.com/conan-io/examples2.git
cd examples2/examples/libraries/tensorflow-lite/pose-estimation/
There, you will find the project. Let’s have a look at the relevant files:
.
├── CMakeLists.txt
├── assets
│   ├── dancing.mov
│   └── lite-model_movenet_singlepose_lightning_tflite_float16_4.tflite
├── conanfile.py
└── src
    └── main.cpp
You can see the source code and CMakeLists.txt for our application, the video we are going to process, and the model for the neural network we will load into TensorFlow Lite. Our application runs the inference on the model (making predictions based on input data) to detect human key points, providing us with the positions of various body joints. The app is organized according to this schematic:

Loading the neural network model
As we previously mentioned, we will use the
MoveNet.SinglePose.Lightning
model in our example. This model is in the form of a .tflite file. The first step is
loading the .tflite model into memory. This file contains the model’s execution graph.
This model is stored in the FlatBufferModel class, and you can create an instance of it
using the BuildFromFile method with the model file name as the input argument.
auto model = tflite::FlatBufferModel::BuildFromFile(model_file.c_str());

if (!model) {
    throw std::runtime_error("Failed to load TFLite model");
}
Next, we build an Interpreter—the class that will take the model and execute the
operations it defines on input data while also providing access to the output. To do so,
we use the InterpreterBuilder, which will allocate memory for the Interpreter and
manage the setup so that the Interpreter can read the provided model. Note that before
running the inference, we tell the interpreter to allocate memory for the model’s tensors
by calling the AllocateTensors() method. In the last line of this block, we also call
PrintInterpreterState, a debugging utility useful for inspecting the state of the
interpreter nodes and tensors.
tflite::ops::builtin::BuiltinOpResolver op_resolver;

std::unique_ptr<tflite::Interpreter> interpreter;

tflite::InterpreterBuilder(*model, op_resolver)(&interpreter);

if (interpreter->AllocateTensors() != kTfLiteOk) {
    throw std::runtime_error("Failed to allocate tensors");
}

tflite::PrintInterpreterState(interpreter.get());
Read and transform the input data
Now, with our interpreter prepared to receive data and perform the inference, we must first adapt our data to match the input format accepted by the model. In this section, we’ll outline the following process:
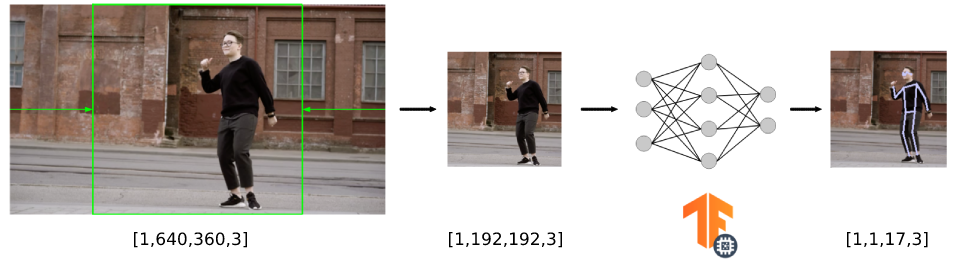
- Read the input video (in our case, it has dimensions of 640x360 pixels).
- Crop the input video frame to create a square image (resulting in an image of 360x360 pixels).
- Resize the image to match the input accepted by the model (we’ll see that it’s 192x192) and copy it to the model’s input.
For this specific model, if we check the documentation, we can see that the input must be in the form of “an uint8 tensor of shape: 192x192x3. Channels order: RGB with values in [0, 255]”.
Although not necessary, we could access the input tensor from the interpreter to confirm
the tensor input size, which in this case is [1,192,192,3]. The first element is the
batch size, which is 1 as we are only using one image as the input of the model.
auto input = interpreter->inputs()[0];

auto input_batch_size = interpreter->tensor(input)->dims->data[0];
auto input_height = interpreter->tensor(input)->dims->data[1];
auto input_width = interpreter->tensor(input)->dims->data[2];
auto input_channels = interpreter->tensor(input)->dims->data[3];

std::cout << "The input tensor has the following dimensions: ["
          << input_batch_size << ","
          << input_height << ","
          << input_width << ","
          << input_channels << "]" << std::endl;
We want to perform pose detection on a video with dimensions of 640x360 pixels, so we have to crop and resize the video frames to 192x192 pixels before inputting them into the model (we have omitted the frame capture code for simplicity, but you can find the code in the repository). To do so, we use the resize() function from the OpenCV library.
// unprocessed frames from our video
int image_width = frame.size().width; // 640 in our example
int image_height = frame.size().height; // 360 in our example

int square_dim = std::min(image_width, image_height); // the min dimension is 360 in our case
int delta_height = (image_height - square_dim) / 2;   // so this is 0
int delta_width = (image_width - square_dim) / 2;     // and this 140

cv::Mat resized_image; // this is the input for the model

// crop to 360x360 and then resize to 192x192
cv::resize(frame(cv::Rect(delta_width,
                          delta_height,
                          square_dim,
                          square_dim)),
           resized_image,
           cv::Size(input_width, input_height));
The final step is to copy the data from the resized video frame to the input of the
interpreter. We can get a pointer to the input tensor by calling typed_input_tensor from
the interpreter.
memcpy(interpreter->typed_input_tensor<unsigned char>(0),
       resized_image.data,
       resized_image.total() * resized_image.elemSize());
This diagram summarizes the whole size conversion pipeline for the video frames.
Running inference
After preparing and copying the input data to the input tensor, we can finally run the
inference. This can be done by calling the Invoke() method of the interpreter. If the
inference runs successfully, we can recover the output tensor from the model by getting
typed_output_tensor from the interpreter.
if (interpreter->Invoke() != kTfLiteOk) {
    std::cerr << "Inference failed" << std::endl;
    return -1;
}

float *results = interpreter->typed_output_tensor<float>(0);
Interpreting output
Each model outputs the tensor data from the inference in a certain format that we have to interpret. In this case, the documentation for the model states that the output is a float32 tensor of shape [1, 1, 17, 3], storing this information:
- The first two channels of the last dimension represent the yx coordinates (normalized to image frame, i.e., range in [0.0, 1.0]) of the 17 key points (in the order of: [nose, left eye, right eye, left ear, right ear, left shoulder, right shoulder, left elbow, right elbow, left wrist, right wrist, left hip, right hip, left knee, right knee, left ankle, right ankle]).
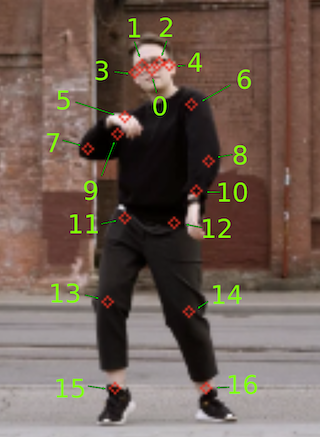
- The third channel of the last dimension represents the prediction confidence scores of each keypoint, also in the range [0.0, 1.0].
We created a draw_keypoints() helper function that takes the output tensor and organizes
the different output coordinates to draw the pose skeleton over the video frame. We also
take the confidence of the output into account, filtering those results that have a
confidence below the 0.2 threshold.
const int num_keypoints = 17;
const float confidence_threshold = 0.2;

const std::vector<std::pair<int, int>> connections = {
    {0, 1}, {0, 2}, {1, 3}, {2, 4}, {5, 6}, {5, 7},
    {7, 9}, {6, 8}, {8, 10}, {5, 11}, {6, 12}, {11, 12},
    {11, 13}, {13, 15}, {12, 14}, {14, 16}
};

void draw_keypoints(cv::Mat &resized_image, float *output)
{
    int square_dim = resized_image.rows;

    for (int i = 0; i < num_keypoints; ++i) {
        float y = output[i * 3];
        float x = output[i * 3 + 1];
        float conf = output[i * 3 + 2];

        if (conf > confidence_threshold) {
            int img_x = static_cast<int>(x * square_dim);
            int img_y = static_cast<int>(y * square_dim);
            cv::circle(resized_image, cv::Point(img_x, img_y),
                       2, cv::Scalar(255, 200, 200), 1);
        }
    }

    // draw skeleton
    for (const auto &connection : connections) {
        int index1 = connection.first;
        int index2 = connection.second;
        float y1 = output[index1 * 3];
        float x1 = output[index1 * 3 + 1];
        float conf1 = output[index1 * 3 + 2];
        float y2 = output[index2 * 3];
        float x2 = output[index2 * 3 + 1];
        float conf2 = output[index2 * 3 + 2];

        if (conf1 > confidence_threshold && conf2 > confidence_threshold) {
            int img_x1 = static_cast<int>(x1 * square_dim);
            int img_y1 = static_cast<int>(y1 * square_dim);
            int img_x2 = static_cast<int>(x2 * square_dim);
            int img_y2 = static_cast<int>(y2 * square_dim);
            cv::line(resized_image, cv::Point(img_x1, img_y1),
                     cv::Point(img_x2, img_y2), cv::Scalar(200, 200, 200),
                     1);
        }
    }
}
Installing TensorFlow Lite and OpenCV dependencies and building the project
Consuming the TensorFlow Lite and OpenCV libraries using Conan is quite straightforward. If you have a look at the CMakeLists.txt of the project, it has nothing particular about Conan.
cmake_minimum_required(VERSION 3.15)
project(pose-estimation CXX)

find_package(tensorflowlite REQUIRED)
find_package(OpenCV REQUIRED)

add_executable(pose-estimation src/main.cpp)

target_link_libraries(pose-estimation PRIVATE
                      tensorflow::tensorflowlite
                      opencv::opencv)
To make Conan install the libraries and generate the files needed to build the project with CMake, we simply need to create a conanfile.py that declares the dependencies for the project.
from conan import ConanFile
from conan.tools.cmake import cmake_layout


class PoseEstimationRecipe(ConanFile):
    settings = "os", "compiler", "build_type", "arch"
    generators = "CMakeDeps", "CMakeToolchain"

    def requirements(self):
        self.requires("tensorflow-lite/2.12.0")
        self.requires("opencv/4.12.0")

    def layout(self):
        cmake_layout(self)
As you can see, we just declare the dependencies in the requirements() method of the
ConanFile. We are also declaring the layout() for the project as cmake_layout, as we
are using CMake for building. You can check the consuming packages tutorial
section of the Conan documentation
for more information.
Now we can use Conan to install the libraries. It will not only install tensorflow-lite/2.12.0 and opencv/4.12.0, but also all the necessary transitive dependencies. For example, for a machine running macOS Ventura the whole dependency graph would look similar to this:
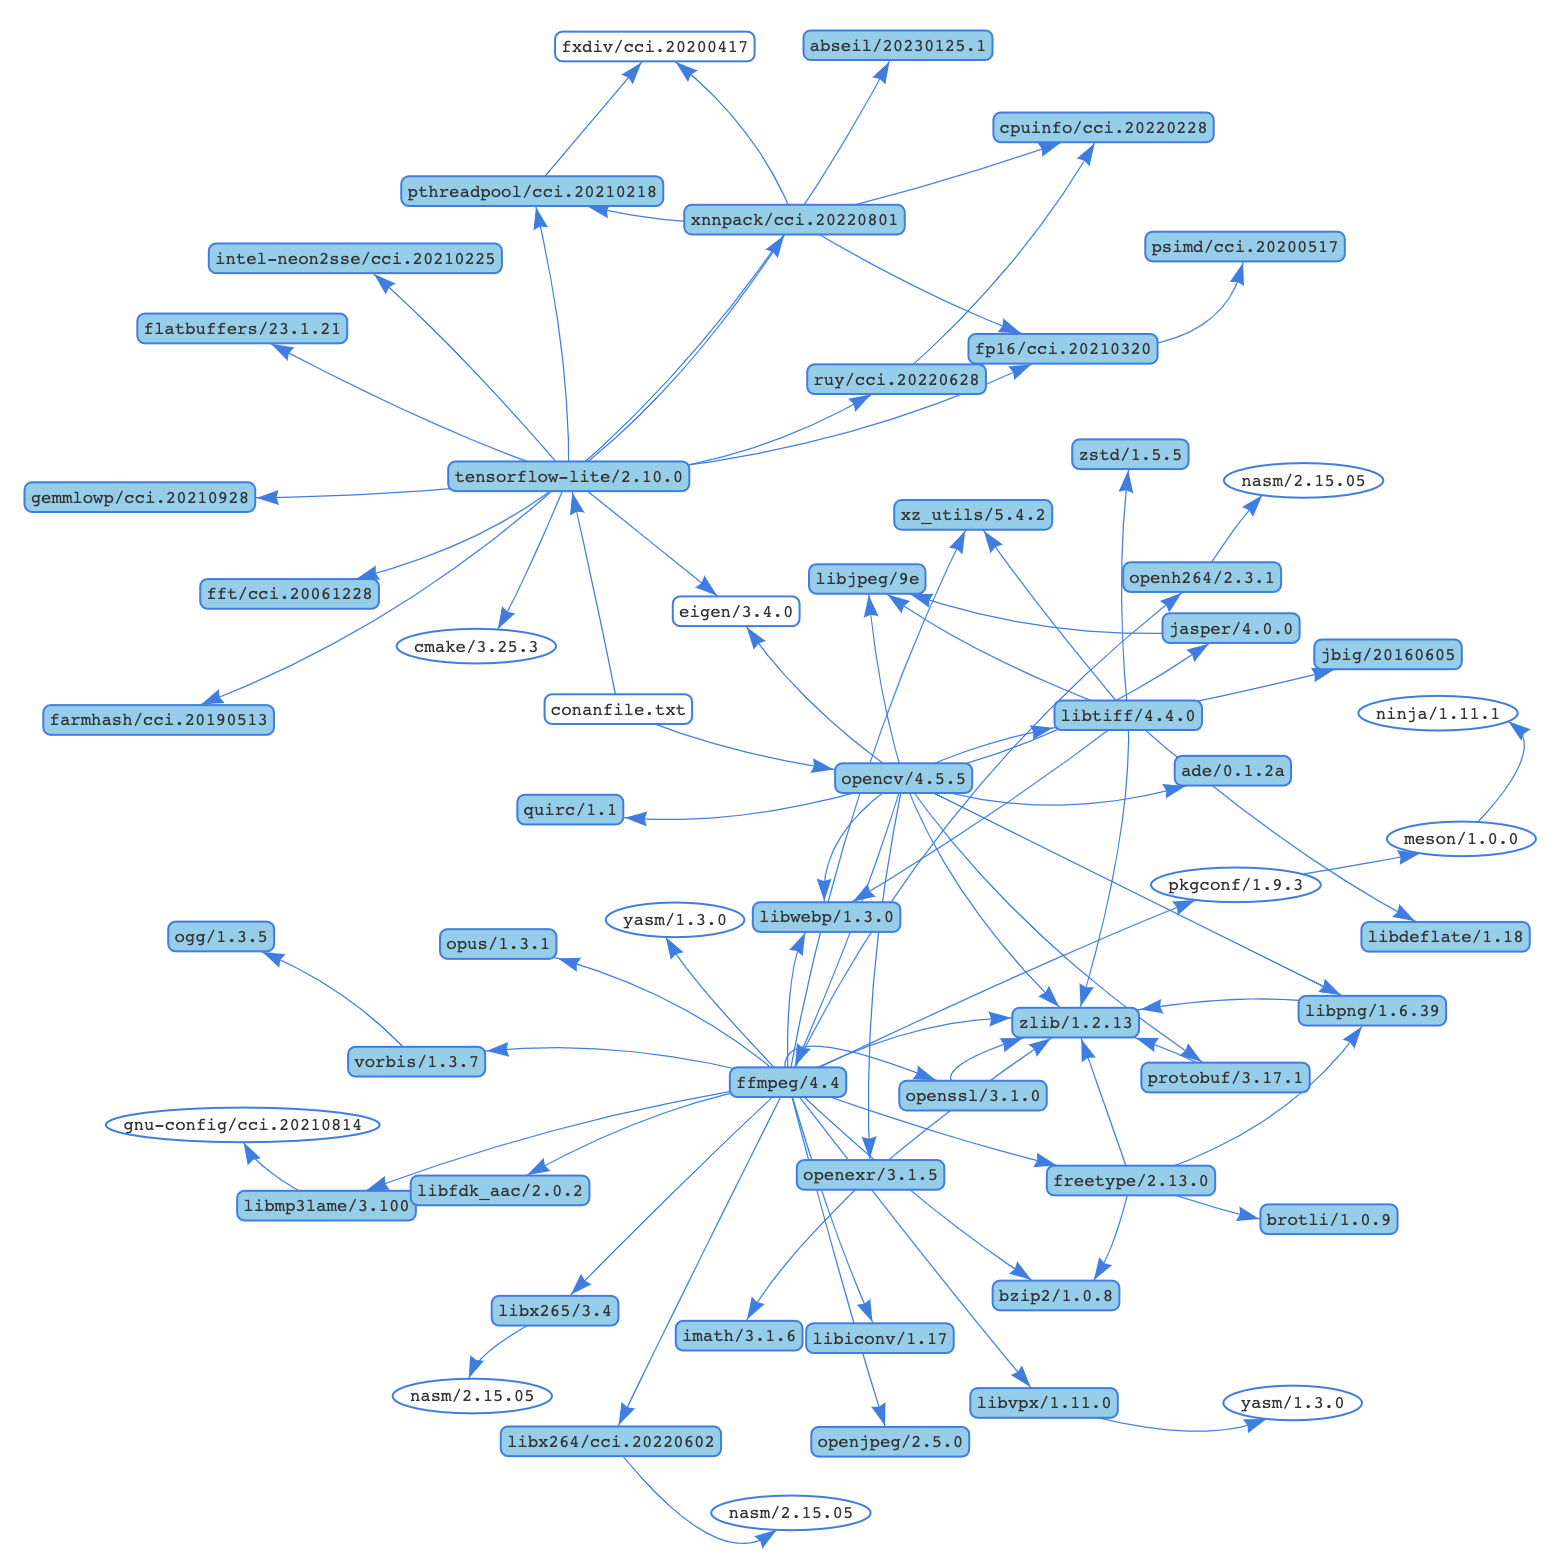
Conan will attempt to install those packages from the default ConanCenter remote, which is the main official repository for open-source Conan packages. If the pre-compiled binaries are not available for your configuration, you can also build from sources.
conan install . -s compiler.cppstd=17 --build=missingA couple of things to take into account:
- We are passing a value for the C++ standard, as the tensorflow-lite library only works with a standard higher than 17.
- We are passing the
--build=missingargument in case some binaries are not available from the remote. - If you are running Linux and some necessary missing system libraries are missing on your
system, you may have to add the
-c tools.system.package_manager:mode=installor-c tools.system.package_manager:sudo=Truearguments to the command line (docs reference).
Now let’s build the project and run the application. If you have CMake>=3.23 installed, you can use CMake presets:
# Linux, macOS
cmake --preset conan-release
cmake --build --preset conan-release
build/Release/pose-estimation

# Windows
cmake --preset conan-default
cmake --build --preset conan-release
build\Release\pose-estimation.exe
Otherwise, you can add the necessary arguments for CMake:
# Linux, macOS
cmake . -G "Unix Makefiles"
-DCMAKE_TOOLCHAIN_FILE=build/Release/generators/conan_toolchain.cmake
-DCMAKE_POLICY_DEFAULT_CMP0091=NEW -DCMAKE_BUILD_TYPE=Release
cmake --build .
./pose-estimation

# Windows. Assuming Visual Studio 17 2022
# is your VS version and that it matches
# your default profile
cmake . -G "Visual Studio 17 2022"
-DCMAKE_TOOLCHAIN_FILE=./build/generators/conan_toolchain.cmake
-DCMAKE_POLICY_DEFAULT_CMP0091=NEW'
cmake --build . --config Release
pose-estimation.exe
Conclusions
Now that you’re familiar with the basics of using TensorFlow Lite in your applications,
you can explore other models. Additionally, having experienced the ease of installing and
using libraries like TensorFlow Lite and OpenCV, you’re now well-equipped to create more
complex applications incorporating additional libraries. To search for all libraries
available in ConanCenter, you can use the conan search '*' -r=conancenter command.
-
Video by Olia Danilevich from https://www.pexels.com/ ↩