Creating small Linux images with Buildroot


There are many embedded Linux distributions ready for use with good functionality, but at the cost of image size, some images can reach 4GB. Sometimes we want embedded systems that support Linux with only the minimum packages needed for our system, such as running a small FTP server with no graphical interface.
To fulfill the object of getting a custom image, we can automate and facilitate building a distro through some build tools for embedded Linux-based systems. Some existing ones today include Yocto and Buildroot, which are open source projects.
In this blog post we will comment on using Buildroot and how we can use it to create a customized image for RaspberryPi3. The entire example is available here.
Buildroot
![]()
Buildroot is a tool for automating the creation of Embedded Linux distributions. It builds the code for the architecture of the board so it was set up, all through an overview of Makefiles. In addition to being open-source, it is licensed under GPL-2.0-or-later.
How to Install
Before starting Buildroot installation, let’s assume you have a Linux environment ready for building C projects, as well as tools for git, svn, and rsync.
You can get more information about the requirements through the official Buildroot documentation.
In order to install Buildroot, we will clone the repository through Github:
$ git clone https://github.com/buildroot/buildroot.git buildrootAnalyzing the Buildroot
Once inside the Buildroot directory, we will have the following tree:
buildroot/
|
├── arch
├── board
├── boot
├── configs
├── docs
├── linux
├── package
├── support
├── system
├── toolchain
└── utils
Each directory holds a set of files needed to set up a part of the build. Here we can highlight:
- board: Contains files for target board mapping and configuration, such as flash memory address and device tree files;
- configs: Contains a series of pre-set configurations to automate which packages and properties should be added to the embedded image;
- packages: Contains all official packages available so far for Buildroot. We are not limited to these packages only, Buildroot allows we to create new custom packages.
We will give more focus to package folder, as our main interest will be to customize the packages installed in our image.
As an example, let’s look at the fmt package, which consists of 3 files:
package/fmt/
|
├── Config.in
├── fmt.hash
└── fmt.mk
Config.in is the package description to be used for Buildroot configuration, it is responsible for maintaining the information for the user interface when choosing which packages to build. It also contains the package dependencies.
config BR2_PACKAGE_FMT
    bool "fmt"
    depends on BR2_INSTALL_LIBSTDCPP
    depends on BR2_USE_WCHAR
    help
      fmt is an open-source formatting library for C++. It can be
      used as a safe alternative to printf or as a fast alternative
      to IOStreams.

      https://fmt.dev/latest/index.html
The fmt.mk file is the Makefile recipe for setting up, building, and installing the library.
FMT_VERSION = 5.3.0
FMT_SITE = $(call github,fmtlib,fmt,$(FMT_VERSION))
FMT_LICENSE = BSD-2-Clause
FMT_LICENSE_FILES = LICENSE.rst
FMT_INSTALL_STAGING = YES

FMT_CONF_OPTS = \
    -DHAVE_OPEN=ON \
    -DFMT_INSTALL=ON \
    -DFMT_TEST=OFF

$(eval $(cmake-package))
This file stores default properties for all other packages, such as its version, site from which to download the source code, software license name, and where to find that license file.
Here you can see that at the end a module called cmake-package is invoked. This module is responsible for handling projects using CMake, where it will execute all necessary commands, from configuration to installation of artifacts. This modularization allows for a higher level of automation, otherwise it would be necessary to describe all CMake commands for each package.
The last and not the least file, fmt.hash holds the checksum of the downloaded file directly from the site.
sha256 defa24a9af4c622a7134076602070b45721a43c51598c8456ec6f2c4dbb51c89  fmt-5.3.0.tar.gz
sha256 560d39617dfb4b4e4088597291a070ed6c3a8d67668114ed475c673430c3e49a  LICENSE.rst
Although we are using SHA-256, Buildroot is able to support other formats like SHA-1 and MD5. The checksum is automatically verified by Buildroot during package download. If the value found is not the same as described, an error will be raised.
Configuring the Custom Image
As our target platform is RaspberryPi3, Buildroot offers a pre-configured file for this board, which is located within the configs directory.
To ask Buildroot that we want to build our configuration from RaspberryPi3, we should use the following command:
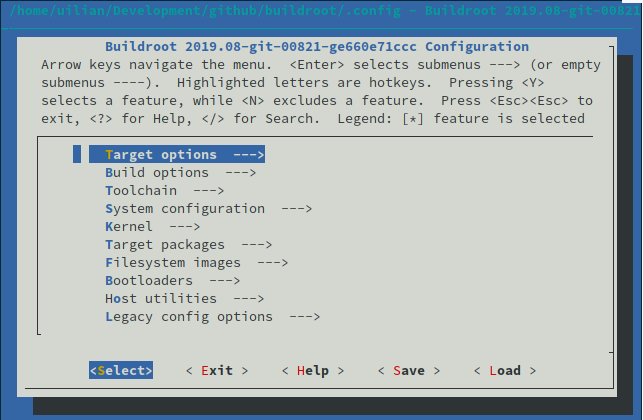
$ make raspberrypi3_defconfigOnce executed, this command will generate the file .config, which contains all the packages, kernel, toolchain and properties needed for our image. To add new packages or edit existing ones, we need to manipulate this file, but this is not very automated and can result in a number of errors during the construction. That’s why Buildroot has more user-friendly interfaces, where you can customize your final configuration, and automatically resolve dependencies. There are different formats for this interface you can try some of them:
$ make config
$ make menuconfig
$ make gconfig
$ make xconfig
During this example we will use menuconfig, as it has a minimal graphical interface and does not require other system dependencies like Qt.
After executing the configuration command, we will have the following output:
As we had already detailed the fmt library before, we will include it in our image, so we have to navigate thought the menu in the following way:
Target Packages -> Libraries -> Text and terminal handling -> fmt
To get more information about the package, you can enter ?. It will show the same content as we had seen in the Config.in file. Once selected, we can save the current setting through the panel and exit by pressing ESC.
Building the Image
Once setup is ready, we can proceed to the longest step in this tutorial, building the image. Although the build is just a command, Buildroot will have to download all the sources that are present in the configuration file, build from sources and finally generate a custom image. To start the build process just run:
$ makeFrom now, Buildroot will take care of the entire build process, which may take a few hours the first time. For future builds, the cache may be reused which will down the build time to a few minutes.
Using Conan for Buildroot builds
Although Buildroot can accept new packages through its package structure, the build process is still a bit long, it could take few hours on the first time. But what if this process could be reduced to just a few minutes by downloading pre-built packages? Let us see some features and aspects from Conan which are related to our scenario:
- Able to provide a unified view of all binaries for all platforms and configurations, not only buildroot;
- Developers might develop fast, test locally with native binaries in their Linux boxes;
- Faster builds, thanks to reusing binaries, not only for development but for production and releases;
- Best DevOps practices, avoiding rebuilding binaries from sources more than once.
Before introducing Conan into Buildroot, we need to understand how the structure of scripts that collaborate with buildroot for package building:
$ ls package/*.mk
package/doc-asciidoc.mk   package/pkg-cmake.mk  package/pkg-download.mk  package/pkg-golang.mk
...
This list of Makefiles are responsible for executing the build process for each given package. Returning to the recipe example for the ZLib library, we have the following section:
$(eval $(cmake-package))This line tells us that the pkg-cmake.mk script will be used to build the ZLib project. In the case of integrating Conan we will have to build a new script with the commands responsible for downloading the desired packages, according to the configuration given by Buildroot, and copy the artifacts to their proper locations.
Integrating Conan with Buildroot
Let’s create a new file called pkg-conan.mk in the package/ directory. At the same time, we need to add it in package/Makefile.in file in order to Buildroot be able to list it.
$ echo 'include package/pkg-conan.mk' >> package/Makefile.inFor script development we will break it down into a few steps. Because it is a large file, we will only portray parts of it in this post, but the full version can be found here.
Buildroot defines its settings, including processor, compiler version, and build type through variables. However, these variables do not have directly valid values for Conan, so we need to parse most of them. Let’s start with the compiler version, by default Buildroot uses a GCC-based toolchain, so we will only filter on its possible versions:
CONAN_SETTING_COMPILER_VERSION  ?=
ifeq ($(BR2_GCC_VERSION_8_X),y)
CONAN_SETTING_COMPILER_VERSION = 8
else ifeq ($(BR2_GCC_VERSION_7_X),y)
CONAN_SETTING_COMPILER_VERSION = 7
else ifeq ($(BR2_GCC_VERSION_6_X),y)
CONAN_SETTING_COMPILER_VERSION = 6
else ifeq ($(BR2_GCC_VERSION_5_X),y)
CONAN_SETTING_COMPILER_VERSION = 5
else ifeq ($(BR2_GCC_VERSION_4_9_X),y)
CONAN_SETTING_COMPILER_VERSION = 4.9
endif
This same process should be repeated for build_type, arch, and so on. For the Conan package installation step we will have the following routine:
define $(2)_BUILD_CMDS
    $$(TARGET_MAKE_ENV) $$(CONAN_ENV) $$($$(PKG)_CONAN_ENV) \
        CC=$$(TARGET_CC) CXX=$$(TARGET_CXX) \
        $$(CONAN) install $$(CONAN_OPTS) $$($$(PKG)_CONAN_OPTS) \
        $$($$(PKG)_REFERENCE) \
        -s build_type=$$(CONAN_SETTING_BUILD_TYPE) \
        -s arch=$$(CONAN_SETTING_ARCH) \
        -s compiler=$$(CONAN_SETTING_COMPILER) \
        -s compiler.version=$$(CONAN_SETTING_COMPILER_VERSION) \
        -g deploy \
        --build $$(CONAN_BUILD_POLICY)
endef
The Conan install command will be executed as usual, but the settings and options are configured through what was previously collected from Buildroot, and accept new ones through the Buildroot package recipe. Because it was a scenario where previously all sources were compiled in the first moment, we will set Conan build policy to missing, so any package will be built if not available.
Also, note that we are using the generator deploy, as we will need to copy all the artifacts into the Buildroot internal structure. Once built, we will copy the libraries, executables and headers through the following routine:
define $(2)_INSTALL_CMDS
    cp -f -a $$($$(PKG)_BUILDDIR)/bin/. /usr/bin 2>/dev/null || :
    cp -f -a $$($$(PKG)_BUILDDIR)/lib/. /usr/lib 2>/dev/null || :
    cp -f -a $$($$(PKG)_BUILDDIR)/include/. /usr/include 2>/dev/null || :
endef
With this script we will be able to install the vast majority of Conan packages, using only simpler information for each Buildroot recipe.
Installing Conan Zlib
Once we have our script for installing Conan packages, now let’s install a fairly simple and well-known project: zlib. For this we will create a new recipe in the package directory. Let’s start with the package configuration file:
mkdir package/conan-zlib
touch package/conan-zlib/Config.in
touch package/conan-zlib/conan-zlib.mk
The contents of the file Config.in should be as follows:
config BR2_PACKAGE_CONAN_ZLIB
    bool "conan-zlib"
    help
      Standard (de)compression library. Used by things like
      gzip and libpng.

      http://www.zlib.net
Now let’s go to the conan-zlib.mk that contains the Zlib data:
# conan-zlib.mk
CONAN_ZLIB_VERSION = 1.2.11
CONAN_ZLIB_LICENSE = Zlib
CONAN_ZLIB_LICENSE_FILES = licenses/LICENSE
CONAN_ZLIB_SITE = $(call github,conan-community,conan-zlib,92d34d0024d64a8f307237f211e43ab9952ef0a1)
CONAN_ZLIB_REFERENCE = zlib/$(CONAN_ZLIB_VERSION)@conan/stable

$(eval $(conan-package))
An important note here is the fact that CONAN_ZLIB_SITE is required even if not used for our purpose. If it is not present, Buildroot will raise an error during its execution. The other variables are simple, just expressing the package reference, name, version and license. Note that in the end we are calling our script which should execute Conan.
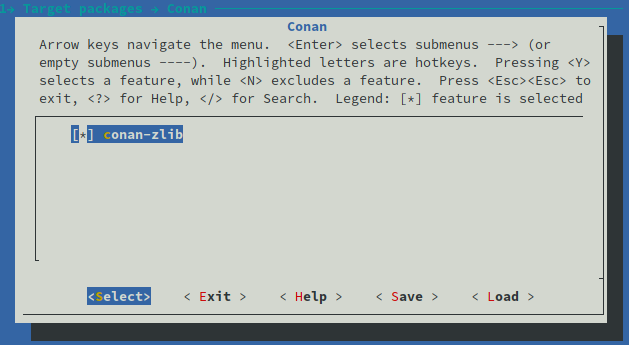
Once created, we still need to add it to the Buildroot configuration list. To do so, let’s update the list with a new menu named Conan. In package/Config.in file, let’s add the following section:
menu "Conan"
    source "package/conan-zlib/Config.in"
endmenu
Now just select the package through menuconfig:
Target Packages -> Conan -> conan-zlib
Once configured and saved, simply run make again to install the package. During its installation we will have the following output:

As you can see, Conan is following the same profile used by Buildroot, which gives us the advantage of not having to create a profile manually.
At the end of the installation it will be copied to the output directory.
Customizing Conan remote
Let’s say we have an Artifactory instance where all packages are available for download. How could we customize the remote used by Buildroot? We need to introduce a new option, where we can write the remote name and Conan will be able to consume such variable. First we need to create a new configuration file to insert new options in Conan’s menu:
$ mkdir package/conan
$ touch package/conan/Config.in
The file Config.in should contain:
config CONAN_REMOTE_NAME
	string "Conan remote name"
    help
	  Look in the specified remote server.
Also, we need to parse the option CONAN_REMOTE_NAME in pkg-conan.mk and add it to Conan command line:
ifneq ($(CONAN_REMOTE_NAME),"")
CONAN_REMOTE = -r $$(CONAN_REMOTE_NAME)
endif

...

define $(2)_BUILD_CMDS
    $$(TARGET_MAKE_ENV) $$(CONAN_ENV) $$($$(PKG)_CONAN_ENV) \
        CC=$$(TARGET_CC) CXX=$$(TARGET_CXX) \
        $$(CONAN) install $$(CONAN_OPTS) $$($$(PKG)_CONAN_OPTS) \
        $$($$(PKG)_REFERENCE) \
        -s build_type=$$(CONAN_SETTING_BUILD_TYPE) \
        -s arch=$$(CONAN_SETTING_ARCH) \
        -s compiler=$$(CONAN_SETTING_COMPILER) \
        -s compiler.version=$$(CONAN_SETTING_COMPILER_VERSION) \
        -g deploy \
        --build $$(CONAN_BUILD_POLICY) \
        $$(CONAN_REMOTE)
endef
Now we are ready to set our specific remote name. We only need to run make menuconfig and follow the path:
Target Packages -> Libraries -> Conan -> Conan remote name
And we will see:
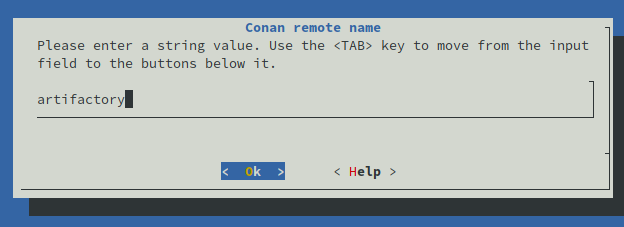
Now Conan is configured to search for packages in the remote named artifactory. But we need to run make again.
Note that it will cost less time to build, since now we have the cache provided by Buildroot. Now we are ready for the last step.
Installing the Image
After two hours and a few coffees and if no errors have occurred during the process we will have the following output:
$ ls output/images/
  bcm2710-rpi-3-b.dtb bcm2710-rpi-3-b-plus.dtb bcm2710-rpi-cm3.dtb boot.vfat rootfs.ext2 rootfs.ext4 rpi-firmware sdcard.img zImage

$ ls -lh output/images/sdcard.img
    -rw-r--r-- 1 conan conan 153M ago  6 11:43 output/images/sdcard.img
These artifacts are the final compilation of everything that was generated during the build process, here we will be interested in the sdcard.img file. This is the final image that we will use on our RaspberryPi3 and it is only 153MB. Compared to other embedded distributions like Raspbian, it is much smaller.
Now let’s copy the image to the destination SD card:
$ sudo dd if=output/images/sdcard.img of=/dev/mmcblk0 bs=4M conv=sync status=progressRemember that the mounting point of your SD card may vary depending on your distribution.
Once done, plug the SD Card into the RaspberryPi3 and power the card, already connected to a video output. You will see the bootloader running normally and finally you will be presented to login screen where the default user is root, no password needed.
Conclusions
In this post we talked about how to use Buildroot to create a Linux distribution without much effort and resulting in a very lean image.
Buildroot helps automate the process of creating a custom embedded Linux distribution with only the developer packages of interest.
Although the build process may take a few hours, with Conan integrating and replacing a few packages, this time can be reduced to just a few minutes.
Interested in knowing more or commenting on the subject? Please do not hesitate to open a new issue.