Continuous integration for C/C++ embedded devices with Jenkins, Docker and Conan


We all know the importance of Continuous Integration while developing software: running unit or integration tests, supporting different platforms/devices, supporting different versions of a compiler or library and having the latest version of the software always ready for a new release are some of the reasons.
Developing a final application in the same platform where it will be finally deployed is fine and makes things easier, as you have the setup done, all the tooling needed is installed and you could at some point even test in your machine simulating the final deploy target for the application.
Programming for embedded devices comes into place that is a horse of a different color. Normally you would have to setup a kind of fixed environment with the variables needed to cross-compile, the cross-compiler and toolchain ready to be used. This does not sound very painful and Conan has already some features to help with such setup: installer packages, python packages to share scripts, the virtualenv generator and conan config install.
However, when you start to support different devices it is quite easy to mess up you environment configuration and you can waste a lot of time checking everything is setup correctly. To help with this we recently published a how-to in our documentation showing a good range of Docker images ready to cross build.
In this post we will show you how to use this images to setup a continuous integration job in Jenkins to cross build for ARM devices and create a final application.
The application as a Conan package
The application we will be building is a simple blink using the WiringPi library to interface the GPIO pins of a Raspberry Pi.
#include <iostream>

#ifdef WIRINGPI
    #include <wiringPi.h>
#endif

int main (void)
{
    #ifdef WIRINGPI
        wiringPiSetup();
        pinMode(0, OUTPUT);
    #endif

    while(1)
    {
        std::cout << "HIGH" << std::endl;
        #ifdef WIRINGPI
            digitalWrite(0, HIGH);
            delay(500);
        #endif

        std::cout << "LOW" << std::endl;
        #ifdef WIRINGPI
            digitalWrite(0, LOW);
            delay(500);
        #endif
    }
    return 0;
}
As you can see it is a quite simple application with some extra defines to avoid the WirignPi library in case it is not needed. We recently included wiringpi/2.46@conan/stable in conan-center so we will use it as an optional dependency.
Here you can see the full project: https://github.com/danimtb/conan-blink-app
The recipe has some settings when using the armv7 configuration:
from conans import ConanFile, CMake


class BlinkAppConan(ConanFile):
    name = "BlinkApp"
    version = "0.1"
    license = "MIT"
    description = "Blink application"
    settings = "os", "compiler", "build_type", "arch"
    url = "https://github.com/conan-community/conan-blink-app.git"
    exports_sources = "CMakeLists.txt", "main.cpp", "LICENSE"
    generators = "cmake"

    def build(self):
        cmake = CMake(self)
        if self.settings.arch == "armv7":
            cmake.definitions["WIRINGPI"] = True
        cmake.configure()
        cmake.build()

    def package(self):
        self.copy("blinkapp", src="bin", dst="bin")

    def requirements(self):
        if self.settings.arch == "armv7":
            self.requires("wiringpi/2.46@conan/stable")

    def deploy(self):
        self.copy("blinkapp", src="bin", dst="bin")
The recipe is quite simple and there are just few points to remark:
- There is a conditional in
build()andrequirements(): This is to manage the optional dependency of WiringPi as said before. package()gets the application in order to make a package of it.- The
deploy()is there to make the app deployable from the command line:conan install BlinkApp/0.1@danimtb/stable
Setting up Jenkins and Artifactory in the CI machine
For this post I am using a Linux machine where Jenkins together with Docker and Artifactory will be running. These are the things you will need:
-
Jenkins: We will use Jenkins for the automation of Continuous Integration jobs.
I used these steps to install it:
$ wget -q -O - https://pkg.jenkins.io/debian/jenkins.io.key | sudo apt-key add -
$ sudo sh -c 'echo deb http://pkg.jenkins.io/debian-stable binary/ > /etc/apt/sources.list.d/jenkins.list'
$ sudo apt-get update
$ sudo apt-get install jenkins
Check the (installation steps)[https://jenkins.io/doc/book/installing/] for other platforms.
-
Artifactory: We will use it as our binary repository to retrieve and upload the Conan packages.
I chose the latest release of Artifactory Community Edition for C/C++ and went for the zip installation:
- Download zip: https://www.conan.io/downloads.html
- Set
JAVA_HOME=/usr/lib/jvm/default-java - Launch Artifactory:
bin/artifactory.sh
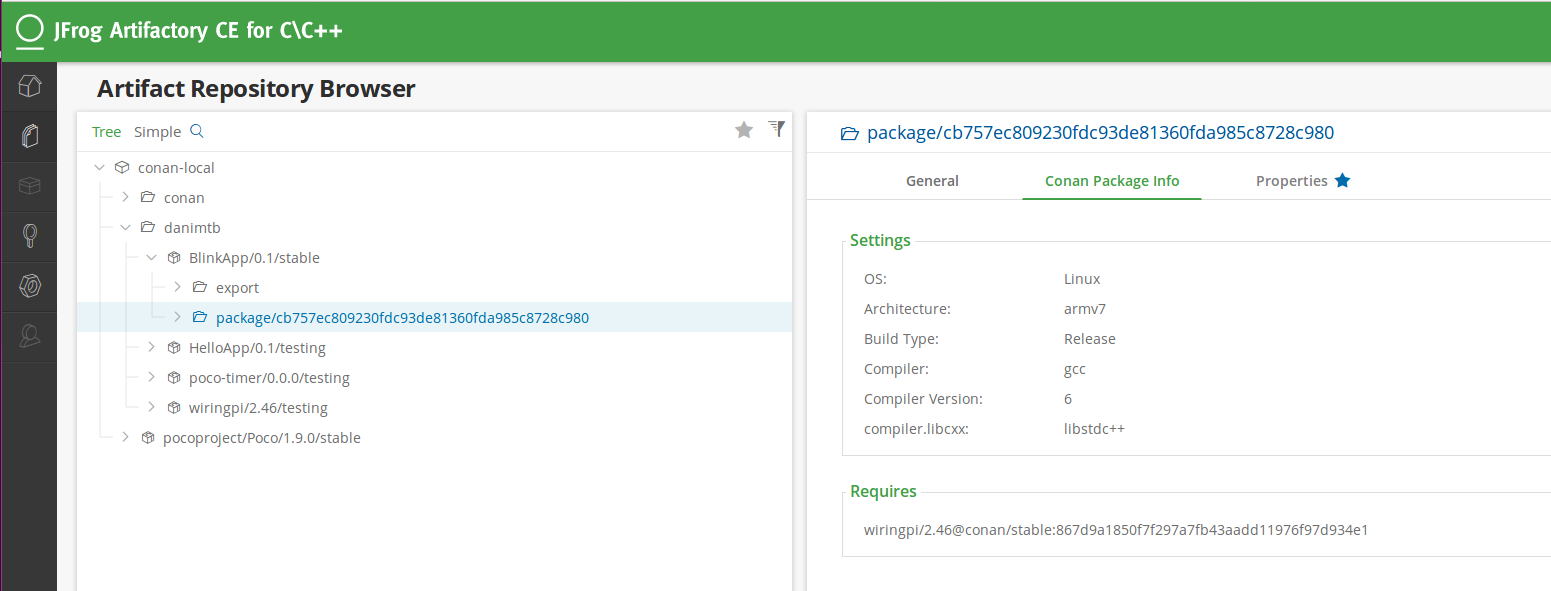
The Artifactory instance should be accessible at:
localhost:8081/artifactory. Just after the configuration steps create a Conan repository called conan-local. -
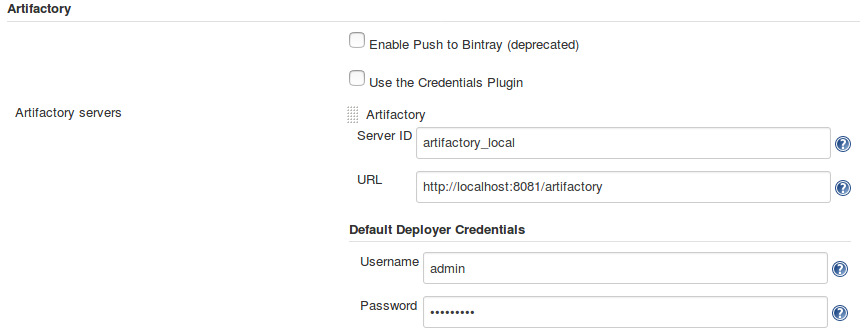
Jenkins Artifactory Plug-in:
Of course, if you are using Jenkins and Artifactory you should take advantage of this plug-in. Makes the integration much easier in the case of Conan to configure the remotes and credentials and to upload the metadata of the build.
Follow the installation steps and configure the plugin with your Artifactory credentials:
-
Docker: Of course, we will be using Docker so we need to have it installed in the CI machine too.
$ apt-get install docker-ee
$ Docker -v
> Docker version 1.13.1, build 092cba3
Check the installation steps for other platforms.
Creating the Jenkins pipeline
There is related information on the web about how to run Jenkins inside a docker container or how to use the Docker plugin to launch builds. However there is not much about how to run a local build inside a Docker container with Jenkins.
This should not be too much complicated if you use a command line script for the build but it is so much better to use the pipeline syntax to control the stages.
Here you can see the Jenkinsfile to create this application:
def artifactory_name = "artifactory_local"
def artifactory_repo = "conan-local"
String docker_image = 'lasote/conangcc6-armv7'

node {
    docker.image(docker_image).inside('-v /tmp/:/tmp/ -v /home/danimtb/:/home/conan/danimtb/ --net=host') {
        def server = Artifactory.server artifactory_name
        def client = Artifactory.newConanClient()
        def serverName = client.remote.add server: server, repo: artifactory_repo

        stage("Get project") {
            checkout scm
        }

        stage("Get dependencies and create app") {
            String strCommand = "create . danimtb/stable -pr /home/conan/.conan/profiles/default"
            client.run(command: strCommand )
        }

        stage("Upload packages") {
            String command = "upload BlinkApp* --all -r ${serverName} --confirm"
            def b = client.run(command: command)
            b.env.collect()
            server.publishBuildInfo b
        }
    }
}
As you can see in the Jenkinsfile we are setting up the name or our Artifactory instance already set up in the Jenkins Artifactory Plug-in
and the Conan repository name. We don’t need to configure any credentials or use environment variable CONAN_PASSWORD.
The Docker image we are using in this case is lasote/conangcc6-armv7 and it will run the build with some directory and network mappings:
docker.image(docker_image).inside('-v /tmp/:/tmp/ -v /home/danimtb/:/home/conan/danimtb/ --net=host')
/tmp/:/tmp/: We will map the temp directory here as it is the directory Jenkins use to store the files and metadata of the build. This is useful to keep that information so that it does not get destroyed after the Docker image is stopped./home/danimtb/:/home/conan/danimtb/: This is just a dumb mapping of a local directory to allow the clone of the SCM just because I was using a local git repository in this case.--net=host: This maps the network of the container to the network of the host. This is needed to upload the packages to Artifactory.
Those images are prepared with a profile inside ready to target the architecture:
String strCommand = "create . danimtb/stable -pr /home/conan/.conan/profiles/default"
client.run(command: strCommand )
Triggering a build
The trigger of the build can be done with normal Jenkins configuration. I used a self-contained one with a local git repository and a multibranch job. This way Jenkins can check the repository for changes and trigger the job.
The multibranch approach has also other benefits, as you can customize your Jenkinsfile in case you have a branch for testing and another
one stable, as you can change the user/channel provided in the conan create step.
Any other approach is also valid, for example, you could trigger the build with a GitHub hook and have the same behavior as if it was a CI build running in Travis CI or AppVeyor.
With the package of the final application uploaded, you can test the application in final devices with a simple
conan install BlinkApp/0.1@danimtb/stable taking advantage of the deploy() and use it for testing purposes like hardware-in-the-loop
or create installers/tarballs to deliver the app and its resources.
Conclusions
As you can see, the most complicated part of this is configuring Jenkins and Artifactory to run the complete example. However, if you already have an instance of each one up and running this should be very straight forward.
This is just an example of what kind of things you can do taking advantage of Docker and Jenkins and one way it can be used to automate the package creation. This could be extended to the creation of libraries, bumping of package versions of a of downstream dependencies whenever there is a new release upstream, running package tests…
You can also create your own Docker image with the tools you want. Check our conan-docker-tools repository to take some inspiration from the Dockerfiles.
Hope you found this example useful to set up a CI machine with everything needed to start automating the creation of your Conan packages!