Cross building and debugging C/C++ libraries for the Raspberry PI


The Raspberry PI is an amazing mini computer, powerful and cheap, the dream of hobbyists and developers around the world. With its potential to implement embedded systems, it is common to use C/C++ for developing its code, specially when efficiency and performance is relevant. However, even if it is a powerful system for the money, it can be slow while building relatively large C/C++ libraries, so cross-building can be very convenient for developers.
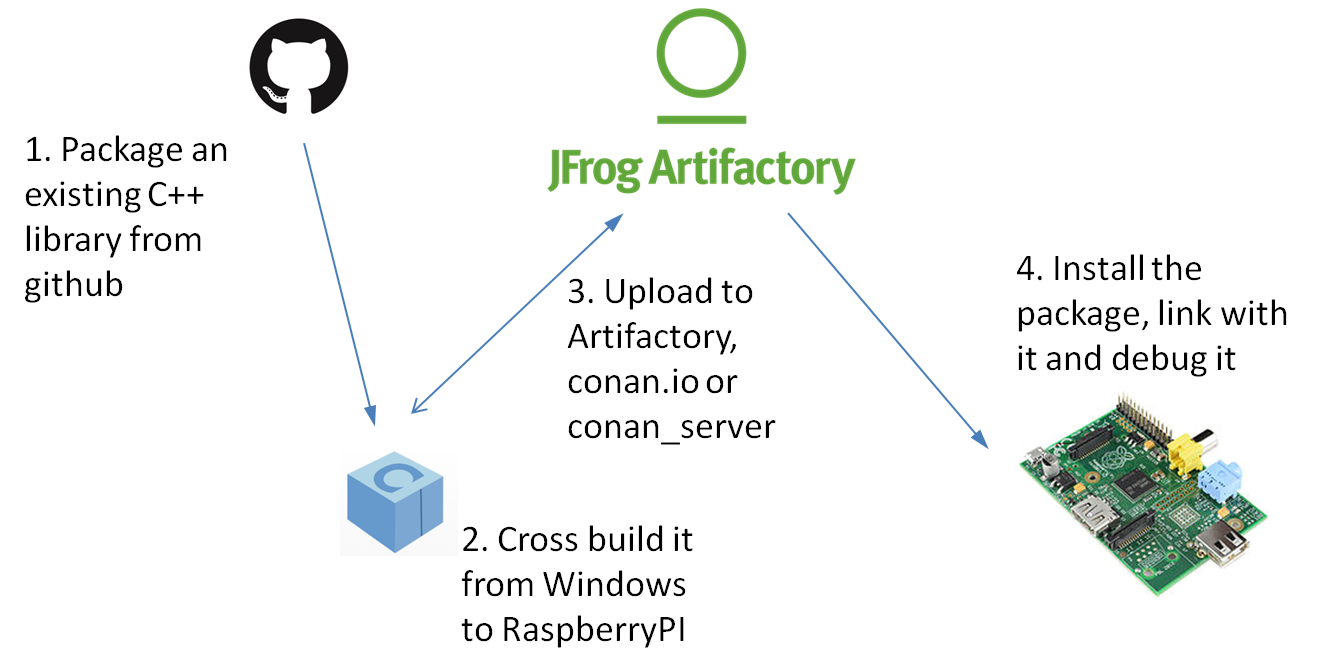
This post will describe how to setup cross building to the Raspberry PI from Windows (from Linux it is also possible, and the configuration would be very similar). A library will be cross-built, a conan package will be uploaded to a server (can be a conan_server, conan.io, or Artifactory), and then such library will be installed and used from the Raspberry PI, i.e. we will build an app and link it against this cross-built library. As bonus points, this post will also explain how to bundle the source code in the package itself, so later the library can be debugged from the Raspberry PI.
Hello world library
The library that will be built and packaged is the one existing in this github repo. It is just a simple C++ “Hello world” library project, using CMake, and nothing special or conan related in it.
We will then start with a package template created with the conan new command:
$ conan new Hello/0.1@user/testing -t # use your own user
Now, lets just replace the root conanfile.py with this one:
from conans import ConanFile, CMake
import os

class HelloConan(ConanFile):
    name = "Hello"
    version = "0.1"
    settings = "os", "compiler", "build_type", "arch"

    def source(self):
        self.run("git clone https://github.com/memsharded/hello.git")

    def build(self):
        cmake = CMake(self.settings)
        gcc_dbg_src = ""
        if self.settings.compiler == "gcc" and self.settings.build_type == "Debug":
            gcc_dbg_src =  ' -DCMAKE_CXX_FLAGS="-fdebug-prefix-map=%s/hello=src"' % os.getcwd()
        self.run('cmake hello %s %s' % (cmake.command_line, gcc_dbg_src))
        self.run("cmake --build . %s" % cmake.build_config)

    def package(self):
        self.copy("*.h", dst="include", src="hello")
        if self.settings.compiler == "gcc" and self.settings.build_type == "Debug":
            self.copy("*.cpp", dst="src", src="hello")
        self.copy("*.lib", dst="lib", keep_path=False)
        self.copy("*.a", dst="lib", keep_path=False)

    def package_info(self):
        self.cpp_info.libs = ["hello"]
It is very similar to the one created by the template, but with two minor differences. First, as we want to be able to debug the packages in the Raspberry PI, it is necessary to define the gcc flag debug-prefix-map, so it points to the relative source folder src instead of the original one. Because we are going to debug in a different machine, where the original absolute source path will make no sense. Se we just define the flag to CMake (conditionally for the gcc and Debug settings):
if self.settings.compiler == "gcc" and self.settings.build_type == "Debug":
    gcc_dbg_src =  ' -DCMAKE_CXX_FLAGS="-fdebug-prefix-map=%s/hello=src"' % os.getcwd()
Then, we just copy the sources *.cpp to the final package (only for the same settings too.)
if self.settings.compiler == "gcc" and self.settings.build_type == "Debug":
    self.copy("*.cpp", dst="src", src="hello")
This package recipe could be tested natively, by just running:
$ conan test_package
Hello world!
Setting the cross-build toolchain
For this example, we are going to use the SysProg toolchain.
We are using the 4.6.3 toolchain, with complete sysroot, which is very convenient. We download the tool, install it in C:\SysGCC\Raspberry and add C:/SysGCC/Raspberry/bin/ to the system PATH.
Now we could just specify cross compilers to the conan command as arguments, like conan test_package -e CXX=some_gcc_compiler, but we can make it easier using a conan profile. So we create a file in <userhome>/.conan/profiles/rpi_gcc46 with the following:
[settings]
    os: Linux
    compiler: gcc
    compiler.version: 4.6
    compiler.libcxx: libstdc++
    build_type: Debug
    arch: armv6
[env]
    CC=arm-linux-gnueabihf-gcc
    CXX=arm-linux-gnueabihf-g++
Note the armv6 architecture and Linux settings, need to be defined, because the default conan settings will correspond to the Windows development box.
As the resulting binary won’t be executable in windows, we change the test_package/conanfile.py so the test() method just checks the existence of the binary:
def test(self):
    if platform.system () != self.settings.os:
        assert os.path.exists("bin/example")
    else:
        self.run(os.sep.join([".", "bin", "example"]))
With this configuration, creating a debug package for the R-PI, can be just done with:
$ conan test_package -pr=rpi_gcc46
Uploading and installing in the Raspberry PI
Once the package has been created locally, it can be uploaded to any conan remote server (conan.io, Artifactory, conan_server):
$ conan upload Hello/0.1@user/testing -r=myremote --all
In the Raspberry PI side, we will just create a very simple consumer project with an example.cpp file:
#include "hello.h"
int main(){
   hello();
}
a CMakeLists.txt script to build it:
Project(Consumer)
cmake_minimum_required(VERSION 2.8.9)

include(${CMAKE_BINARY_DIR}/conanbuildinfo.cmake)
conan_basic_setup()

add_executable(example example.cpp)
target_link_libraries(example ${CONAN_LIBS})
and the conanfile.txt to install dependencies:
[requires]
Hello/0.1@diego/testing

[generators]
cmake

[imports]
src, *.cpp -> src
Note how the the .cpp sources are copied (“imported”) from the package, to the current binary folder, so the debugger can easily locate them.
Installing the cross-built “Hello” package is easy, now we don’t need profiles, as the R-PI defaults are good, so we just set the build_type:
$ conan install .. -s build_type=Debug
Building and debugging
Building our R-PI app is now standard cmake process:
$ mkdir build && cd build
$ cmake .. -DCMAKE_BUILD_TYPE=Debug
$ cmake --build .
$ bin/example
Hello World!
The good thing, is that for this example we have built it for Debug, mode, so we can debug the application and step into the package library code:
$ gdb bin/example
> ...
> Reading symbols from /home/pi/consumer/build/bin/example...done.
(gdb) start
Temporary breakpoint 1 at 0x8914: file /home/pi/consumer/example.cpp, line 4.
Starting program: /home/pi/consumer/build/bin/example
(gdb) step
hello () at src/hello.cpp:5
5               std::cout << "Hello World!\n";
And voilá, we can see the hello.cpp source code line!
Conclusions
Conan is a pure python app, so installing it in the Raspberry PI was as easy as sudo pip install conan.
In this example we have shown how to create packages with debug information for gcc and gdb, but similar approaches can be implemented for other platforms too, for example, packaging the .pdb files of Visual Studio.
As conan is very orthogonal to the build system and compiler, cross building packages with conan is straightforward. Profiles are a very convenient feature to gather together settings, options and environment variables, for easy switching between different development environment and targets.
When cross-building toolchains are more complicated, things can require a bit more of configuration to take into account the variability of those toolchains, but can be certainly done. We are aware of conan users actively using conan to package for Android and iOS systems. In any case, we are preparing some major improvements for management of build requirements, like the Android toolchain, that you will surely love. Keep tuned, follow us on x or subscribe to our release annoucements mailing list!